Been busy the past few weeks planning and tearing down my 180sx. Pics are up @ www.myspace.com/katsumbhong
-Mainichi Tuning
Saturday, September 27, 2008
Wednesday, September 10, 2008
The White Bunny Special
Follow the White Rabbit...
Here in Japan there are a lot of great places to get second hand parts for cars, especially Nissans. I see *used* Super Single Clutch kits selling on Yahoo Auction Japan for as a little as $150. Friends would sell stock SR engines w/ aftermarket clutch set ups as well as all necessary wiring and ECU for less than 7 bills.

I've searched the American auction sites like eBay and have found very few used aftermarket clutch set ups. I've instead found F1 Racing Clutches, many no-name company clutches which mix composites such as Carbon Fiber and Ceramic into their clutch materials. These organizations sell these clutch sets for around the $150~$300 in new condition. There's the saying "You get what you paid for" =/. Haven't had much experience with the products of these "new" companies, but for such a cheap price... I am very wary of putting such parts on my car. I would put little gadgets and materials I purchase off eBay for my car, but for something as important as the Driveline, I try and shy away from anything that can wreck havoc on adjacent parts because I wanted to cheap out on using quality parts.

The purpose of an aftermarket clutch is to complement added horsepower you have or plan to make. The stock clutch of your vehicle is rated to handle only so many ft/lbs of torque. When you make more power with your engine, it will produce more ft/lbs of torque and likely turn your stock clutch into strands of organic spaghetti. An aftermarket clutch is designed to handle increased torque as well as provide more feedback to the driver of the workings of the driveline from the bottom of their left foot.
Video of Destroyed Clutch
There are good quality parts companies that provide support in the form of aftermarket clutches to the U.S.-Spec 240sx. Exedy, ACT (Active Clutch Technologies), Centerforce, Clutchmasters, etc. These companies have basic upgraded clutches which start around the $300 mark and above depending if you are getting a more serious set up involving Super Single kits or Multi-Disc setups.

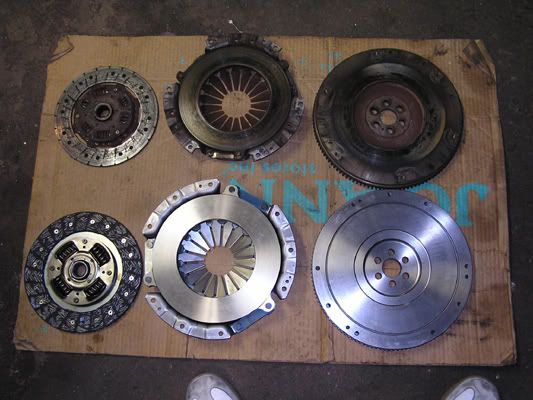
This is where the White Bunny comes in. The phrase "White Bunny" refers to the 1998 White 240sx Turbo SE owned by s14turbose of 240sxforums. The White Bunny Clutch Set Up uses a mix of Nissan/Datsun clutch and driveline parts that act as an aftermarket clutch kit.
The KA-series engine uses a 225mm Clutch Disc while the White Bunny Clutch Setup uses a 240mm Clutch Disc. With a wider diameter clutch disc, this would, in theory, give you more of a usable area that your clutch can engage compared to the smaller clutch disc and give you more room to play with horsepower.
Parts include:
Nissan D21 Truck Flywheel
Nissan 280Z Turbo/Z31 300zx/any Nissan clutch disc that has a surface area of 240mm along with clutch cover
240sx/Z32 Throw Out Bearing
240sx M/T Pilot Bearing
A few extra clutch cover bolts.
This setup will cost around $215 or less depending on where you get the parts. It was suggested to me by BigGameHit to use www.thepartsbin.com for the clutch and clutch cover.
The following write-up is from BigGameHit on NicoForums borrowed from 240sxAddict on 240sxForums
240sx white bunny clutch setup
Yup well after more research i went with this setup, i would explain, but ill just show the facts from another buddies setup. I have had a mixture of different clutches over the years ranging from oem to ACT Xtream. i just like to try new things. my current setup with lighten flywheel is failing becuase of Weak Diaphragm.
---
(taken from 240sxforums 240sxAddict/creator from another forum)
The "White Bunny Special" was first created and explained by s14turbose, the "white bunny" being his 98 S14 turbo SE. KA24's come stock with a 225mm clutch surface area, but using parts from other nissans allows you to run a 240mm clutch, which by logic gives you more tractable area for the clutch to grab onto thus reducing the chance of slippage.
We used the flywheel of a 1993 D21 Pickup(4 cylinder model), which is the standard flywheel to use because it carries the same crank bolt pattern as our cranks but is a 240mm flywheel. I believe any year will work, 87 being a common year people use but to play it safe use the 93 because I just installed one and it fit fine. There is also talk of lightened 240mm flywheels, but I have yet to see any that arent custom made.
Now the pressure plate and clutch disc are varied. We used the stock setup of the afor-mentioned 93 D21, but common clutches used are off the 280Z Turbo, the 300ZX Turbo, and the RB series clutches. You can use both aftermarket and stock as long as it is 240mm. But one rumor surrounding this special is the truck and 280Z clutch can hold balls of torque, some saying near 400ft/lbs and they still retain stock pedal feel and longer life than aftermarket clutches. I'm still searching for the answer, but I read it went on Mike Lee's T66 KAT, and it had no problems holding 500rwhp.
One very important point is that the 240mm clutch uses 9bolts to hold the pressure plate onto the flwheel, while your stock uses 6. Be sure to pick some up before you attempt this. Also, you'll have to break the small pin on the crank off to bolt up the flywheel, as it has no slot for it.
Update:installation pictures
after about 2 cans of brake cleaner still had 2more to go
as a result of not running my dust cover this happen. i thought it would help with cooling, but was I wrong..................yup
more size difference pics


tools used to remove old worn pilot bearing for act bearing


putting new setup on
the little bulge that you see at the bottom of the dust cover is what the flywheel will grind down. when the noise has stopped, you will be able to insert your bolts at the bottom of the bell housing. after that, more noise will sound for about 1 minute. after that your all go.


My pictures ( total price $215 dollars)


- Mainichi Tuning
Monday, September 8, 2008
Ticking Time Bombs
Timing Chain Guides... guide timing chains.
The DOHC KA timing chains are located in front of the engine. They are wrapped around the camshafts, distributor gear and crank gears. Excessive movement of the timing chain is kept in check by the timing chain cover, timing chain guides and a tension side guide.
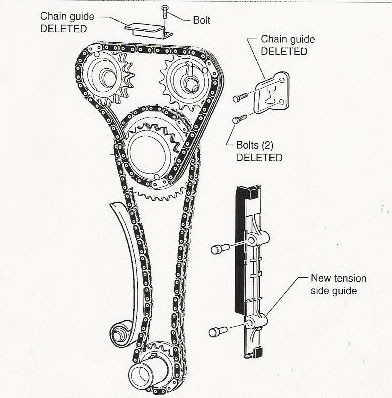
(Photo is of a Nissan Altima Timing Chain,Tension guide is located on the opposite side for the DOHC KA)
The problem with the timing chain guides is that they make a ticking sound near the front of your engine because they are smacking up against the guides. When metal smacks against metal enough, it will start wearing the metal down. As soon as it wears down, metal will break off and bits of metal getting caught in your timing chain between any of the gears behind the timing cover will cause skipping of teeth which will lead to a severely damaged engine through the form of engine detonation.
The Solution?
Remove the upper and side timing chain guides. It's easy and anyone that can follow simple instructions can do it.
For the following DIY Instructions are a combination of:
Text and Photos from ILikeMy240sx @ NicoForums
Photos from BigGameHit's Writeups @ his personal site
HOW-TO: Fix Your Timing Chain Rattle
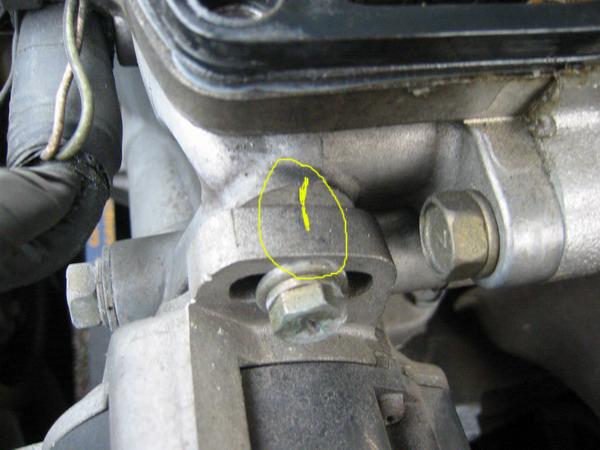
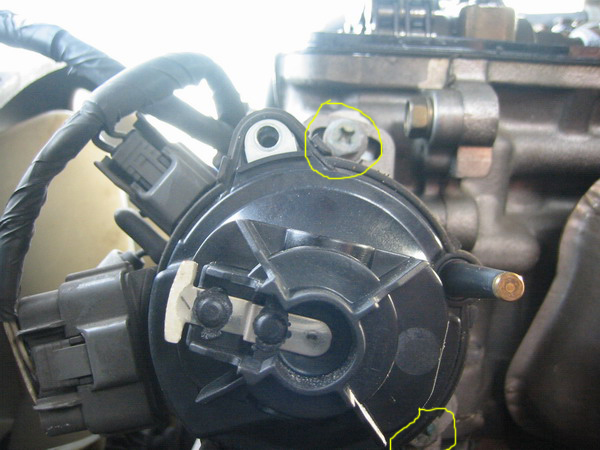
-Now before you start taking off the distributor, make a making on the mount as shown below. This will help you with installing everything back with close to correct timing.
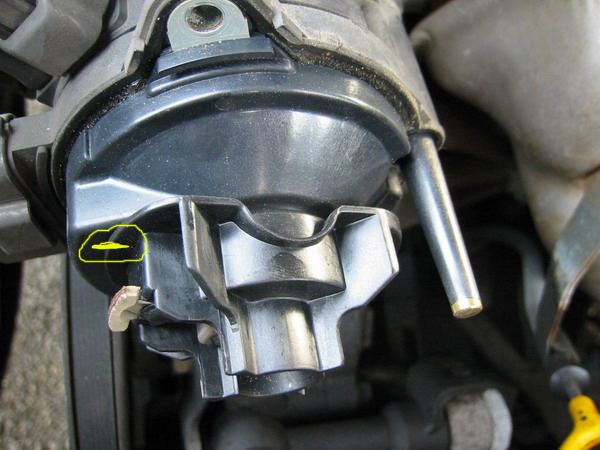
-Using a screw driver take off the cap(part that has the spark plug wires attached) off the distributor. There are two screws holding this. One on top and one on bottom. Once you take it off, you should see this. Make a marking on the rotor and the distributor so that when you install it, you know it's in correct position.
- Now, you are ready to take the distributor off. Unbolt the two bolts, circled in yellow, that are holding the distributor. One on top and one on bottom.
The DOHC KA timing chains are located in front of the engine. They are wrapped around the camshafts, distributor gear and crank gears. Excessive movement of the timing chain is kept in check by the timing chain cover, timing chain guides and a tension side guide.
(Photo is of a Nissan Altima Timing Chain,Tension guide is located on the opposite side for the DOHC KA)
The problem with the timing chain guides is that they make a ticking sound near the front of your engine because they are smacking up against the guides. When metal smacks against metal enough, it will start wearing the metal down. As soon as it wears down, metal will break off and bits of metal getting caught in your timing chain between any of the gears behind the timing cover will cause skipping of teeth which will lead to a severely damaged engine through the form of engine detonation.
The Solution?
Remove the upper and side timing chain guides. It's easy and anyone that can follow simple instructions can do it.
For the following DIY Instructions are a combination of:
Text and Photos from ILikeMy240sx @ NicoForums
Photos from BigGameHit's Writeups @ his personal site
HOW-TO: Fix Your Timing Chain Rattle
Introduction:
There are three possible reasons why your timing chain is making the rattling noise.
1. Oil pressure is low: The tensioners that keep the timing chain tight are operated by oil pressure so if your oil pressure is low then the tensioner will not be working properly hence your chain will flap around and hit the guides.
2. Tensioner is stuck: If you have alot of oil gunk on your tensioner then the tensioner will be stuck and not extend out all the way to keep the timing chain tight.
3. Tensioner is broken: If your tensioner is mechanically broken then you need to replace it.
Having said that, before you follow this write-up it is a good idea to check your oil pressure. Also, in this write up I will not go over how to replace the tensioner but rather tell you how to clean it while it's still installed.
Difficulty: On a scale from 1~5 (5 being the hardest): 2/5
Time: Approximately 3 hours. Assuming you have no previous experience.
Tools:
-Metric Sockets including 27mm for the crank bolt
-Ratchet and wobble extensions
-Screwdriver
-Torque wrench
-Breaker bar (not necessary)
-Timing Light
-RTV Liquid Gasket
Procedures:
1. Set your #1 piston at TDC on compression stroke
-NOTE: You can tell you are at TDC on compression stroke by looking at the cams. As seen in the picture of the cams below, exhaust and intake cam lobes for #1 cylinder should be facing outward. So you might want to open the valve cover first then rotate the crank pulley. If the #1 cylinder cams are facing inwards then just rotate your pulley another 360 degrees until they are facing outwards.
-Jack up your car and crawl under your car
-Take a 27mm socket and a breaker bar and rotate the crank pulley clockwise using the crank bolt.
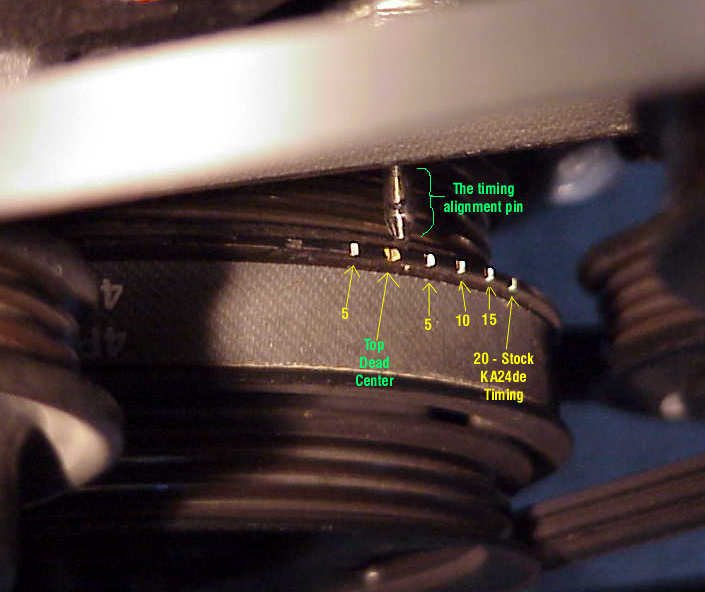
-Match the notches on the crank pulley with the needle as shown.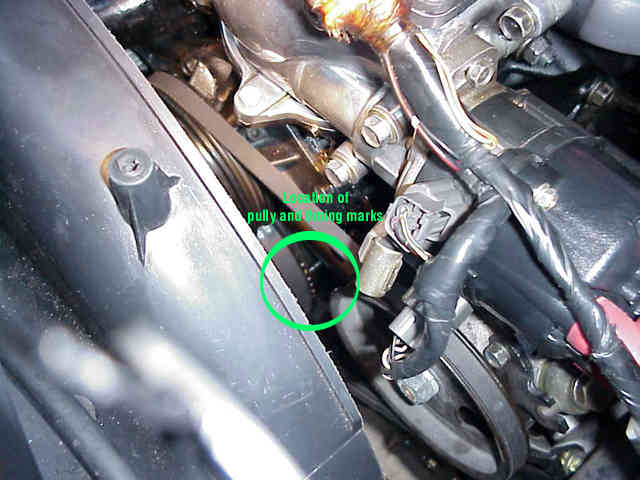
-Lower your car
2. Take off the valve cover
-Remove the spark plug wires.
-Loosen bolts as shown below.
-The bolts closest to the firewall might be a bit hard to get to because of wires and brake lines but try to push those away and wobble extension will help.
3. Remove the upper timing chain guide #1
-Note here the position of the cam lobes on #1 cylinder. They are facing outwards which means its at TDC on compression stroke. If the #1 cylinder cams are facing inwards then just rotate your pulley another 360 degrees until they are facing outwards.
-Remove the two bolts circled in yellow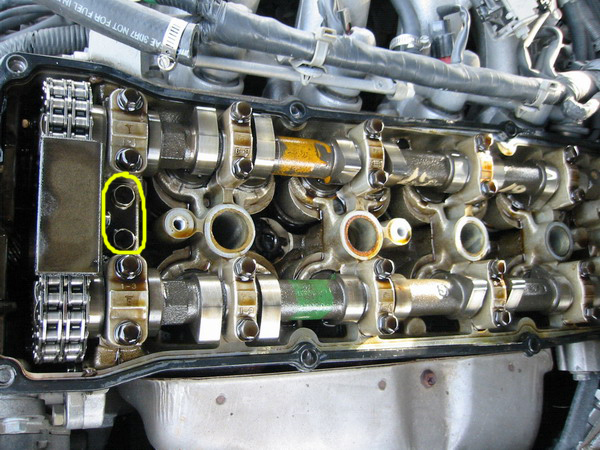
-What my guide looked like. Check out the wear.
-Now before you start taking off the distributor, make a making on the mount as shown below. This will help you with installing everything back with close to correct timing.
-Using a screw driver take off the cap(part that has the spark plug wires attached) off the distributor. There are two screws holding this. One on top and one on bottom. Once you take it off, you should see this. Make a marking on the rotor and the distributor so that when you install it, you know it's in correct position.
- Now, you are ready to take the distributor off. Unbolt the two bolts, circled in yellow, that are holding the distributor. One on top and one on bottom.
- Tug on the distributor with a bit of force. It should come out with a sound of "pop"
5. Take off the camshaft sprocket cover
- Here is a picture of the cover with location of the bolts and their torque specs. Please remember to distinguish between lb*in and lb*ft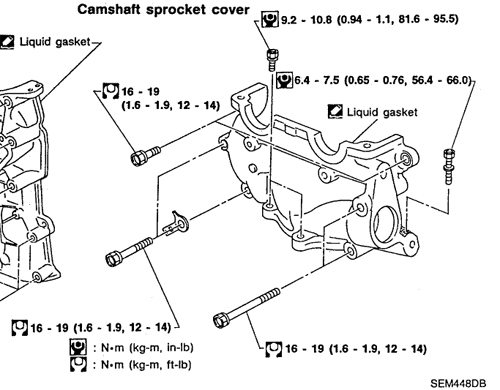
- You might have to take a rummer mallet and gently tap on cover to get it off.
6. Remove the guide #2 and clean the tensioner
- Remove the two bolts, circled in yellow, to remove the guide #2.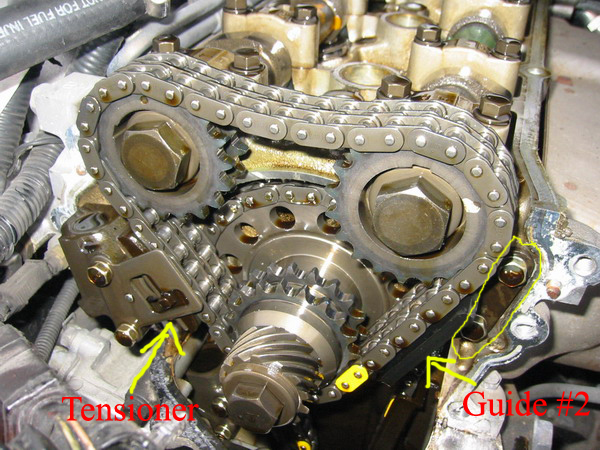
-What my guide looked like.
-Now check the condition of the tensioner. If it's really gunked up with oil then spray some WD-40 and move the tensioner in and out repeatedly (many many times) until it comes out all the way and goes in all the way freely. Here is a video of what I am talking about.
Video Link
To make sure that the tensioner is all the way out, try pushing the tensioner towards the chain.
-Check the condition of the bottom tensioner as well. It it's stuck then do the same thing as the upper tensioner. Here is a picture of the lower tensioner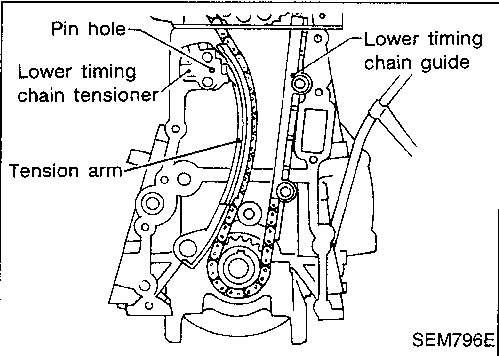
7. Install the camshaft sprocket cover
-Now your guides are gone and your tensioners are working again. It's time to install everything back together.
-Using a plastic scrapper of some sort clean the surface where the camshaft sprocket cover meets the engine. Be careful not to drop any gunk down the front cover.
-Apply your RTV liquid gasket as shown in the picture.
-Install the camshaft sprocket cover and torque to specs. Go easy on the tightening since the head is aluminium and you can easily strip the thread.
8. Install your valve cover
- Put your gasket in the valve cover as shown in the picture.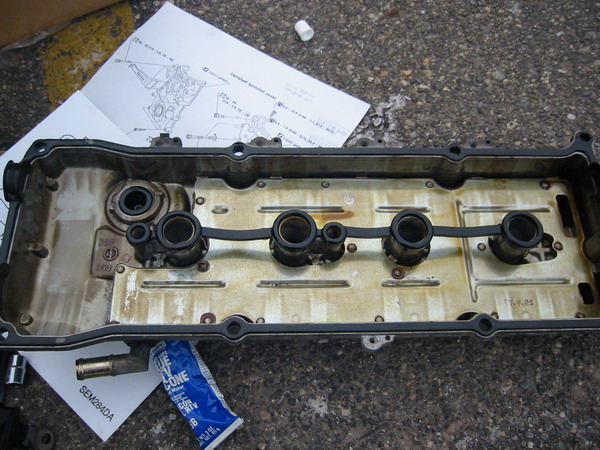
-Apply RTV sealant at the semi-cricle "ditch" in front of the camshaft and also in the back as shown in the picture.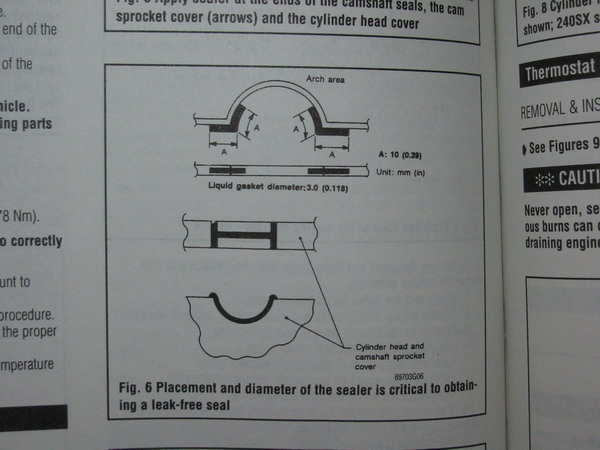
-Install your valve cover and tighten as shown below. Torque spec is around 7~10 lb*ft
9. Install Distributor.
-Now this is the tricky part...
-If your car is S13, your distributor should look like this when #1 piston is at TDC on compression stroke.
-If your car is S14, you should align the distributor as shown below and it should look like this installed.
-If you made the mark on the rotor before, this would be a simple process assuming your engine did not move.
-Also, your rotor should be perfectly aligned with #1 spark plug wire as shown below.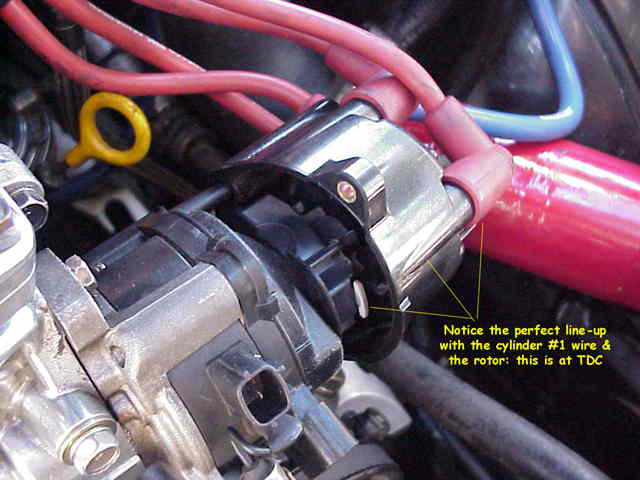
-Rotate your distributor so that it matches the marking you made on the mounts previously. This should bring you close to the timing you had before.
-Please note the spark plug wire position and install them back.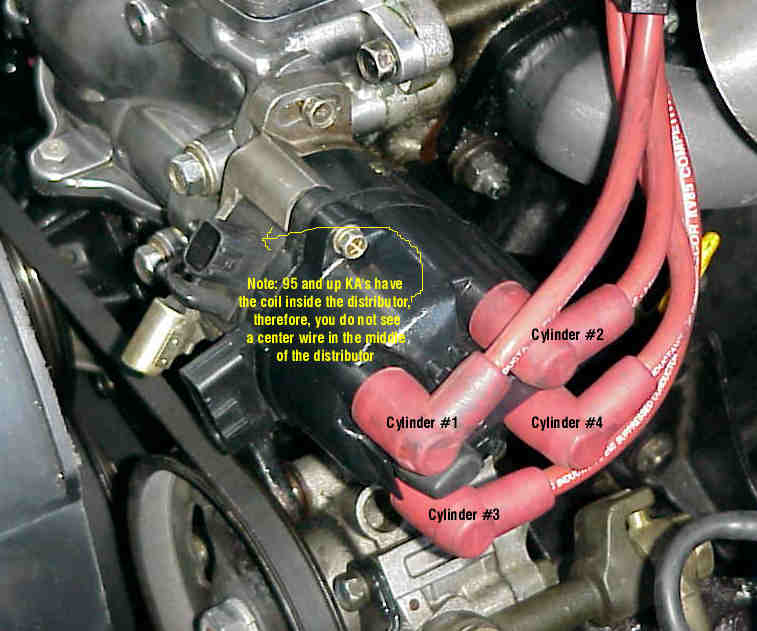
-Make sure everything is connected and good to go. Start your car and check your timing. If its not in spec, disconnect your throttle position sensor and adjust your idle so that is around 700 +-50 and check your timing. If its out of spec, make sure you installed your distributor correctly and rotate your distributor accordingly to retard or advance timing.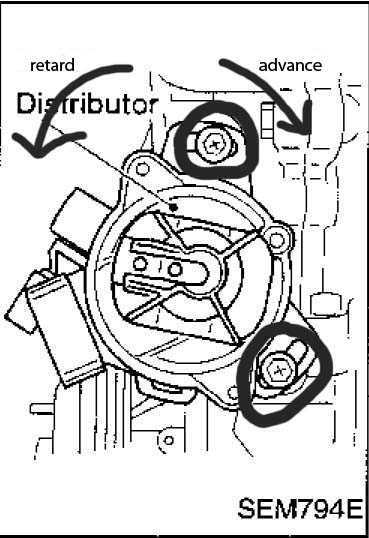
Pat your self on the back and grab a bottle of beer. You are finally done with the infamous timing chain guide noise.
-Mainichi Tuning
Thursday, September 4, 2008
KA24DE... the Red Headed Stepchild
The KA24E and KA24DE engine found in the Nissan 240sx 1989-1998 is widely viewed as "The Truck Motor" and is considered a Con compared to the Japanese-spec CA18DET and SR20DET engines.
U.S. Spec
Year: 1989-1990
Vehicle: Nissan 240sx
Engine: KA24E
Year: 1991-1994
Vehicle: Nissan 240sx
Engine: KA24DE
Year: 1995-1998
Vehicle: Nissan 240sx
Engine: KA24DE
KA Engine Outputs (information compiled by BigVinnie @ s-chassis.com)
Redline: 6500RPM
1989 KA24E
9.1:1 Compression Ratio
144 HP 5600RPM 155LB/FT torque @4400
1990 KA24E
8.6:1 Compression Ratio
140 HP@ 5600RPM, 155LB/FT torque @4400
1991-1994 KA24DE
9.2:1 Compression Ratio
155 HP @ 5600RPM, 156 LB/FT torque 4400
1995-1998 KA24DE
9.5:1 Compression Ratio
156HP @ 5600RPM, 160 LB/FT torque 4400 RPM
*Engine Output is rated from factory (most likely from the clutch). There have been dynos done on completely stock SOHC and DOHC KA engines that show engine output anywhere from 100whp-120whp (measured at the wheels). The Power Output drops when you measure from the wheels because of parasitic HP loss through the vehicle's drivetrain.
**S13 KA24DE used 240/248 Cams while the S14 KA24DE used 232/232 Cams. Why such similar power outputs? The S13 ECUs and S14 ECUs use different fuel maps.
Features of the KA Engine (information attributed by Motorworx @ zeroyon.com)
- Cast Pistons (Not Strong)
- Forged Steel Connecting Rods (Strong) [note: KA rods are said to shotpeened vs being forged, once I can take a look at a conrod, i'll let you all know]
- Forged Steel Crankshaft (Strong)
- 86mm Bore
- 96mm Stroke (Long Stroke = Not Designed for High Revs)
- Iron Block (Strong but Heavy)
- Aluminum Cylinder Head (Light)
- Broad Powerband due to the long stroke
- Larger Ports vs SR Engine
- Larger Valves vs SR Engine
- Larger Pistons vs SR Engine
- Cam-On-Lifter Head Design (Reliable and Durable) vs SR Engine Throw-The-Rocker Head (Wandering Rocker Arms @ High RPM)
Although the stock SR20DET (T for Turbo) engine puts out more HP than a KA24DE engine, the KA24DE is designed beefier than the SR20DET. The only real design quirk of the KA is the high stroke which limits the ability of the engine to rev very high. A shorter stroke engine can rev higher because of less rotational inertia. It has less distance to travel for a full rotation. The higher the rpm the more critical it is for bottom end components to be balanced in order to handle the high number of rotations without "wobbling" or causing excess vibration. The longer the rotation (the longer the stroke), the more well balanced the components must be in order to handle the longer distances the rod and piston must travel.
No Revs???
So what to do with a beefy engine that doesn't rev high? You apply forced induction. Forced Induction includes the use of Nitrous Oxide (NOS/Naaaawwwwzzzzz), Superchargers, Turbochargers, or any mix of the three.
Nitrous Oxide is an expendable source of power that comes in the form of High Pressure Tanks. Current technology enables users to employ NOS with the push of a button, at any given RPM, at any given Throttle Position, can be employed in stages of different amounts of boost, etc. I see NOS as an effective source of power for straightaways... and only straightaways. There are D1 drift cars using NOS for a little extra umph, but for the simple fact that it's all gone when the bottle is empty doesn't excite me one bit.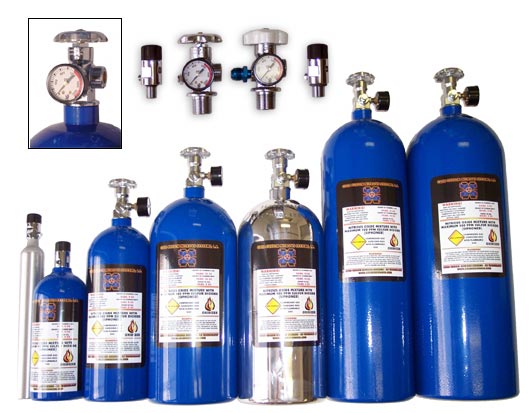
Turbochargers use exhaust gases to spin a turbocharger to produce boost. There are many examples of turbocharged KA engines running serious amounts of boost producing seriously insane numbers on the Dyno. You can fabricate your own turbo kit on the cheap, or shell out buku bucks for pre-made kits.
Superchargers produce boost off engine pulleys. Thomas Knight makes a supercharger kit for the KA24DE but not a lot of information is available from their site... other than it's expensive (cho takai!). There have also been some enthusiasts adapting a Nissan Pathfinder supercharger to work on the KA24DE with custom brackets, pulleys and belts.
There have been KA engines built to make 200whp NA spending upwards of $1,000 on parts, but it is not very cost effective or emissions compliant in California.
All in all, the KA engines are good, reliable, torque-y engines by design. Some may argue that the best way to make power in a 240sx is to swap in an SR20 turbo engine, but if you take the time and realize what you have, you'll know that you have a diamond in the rough.
- Mainichi Tuning
Subscribe to:
Comments (Atom)