Sunday, July 5, 2009

Altering Acceleration

Hey everyone!

Sorry for not updating in the past few months. I've been busy working with Team Thursday Knights in San Diego on events and working on a few of my friends' 240sx's. I start school next month and should be living it easy until I get my Associate's Degree. Anyways, enough of my blibber blabber, here we go to some sick mods for you S13/S14 240sx!!!!


Final Drive: 4.636


There are different types of modifications to help you accelerate faster in your 240sx. Bolt-ons and power adders are a "No Brainer" in helping your car accelerate through more power being put down to the pavement. You can also slap on sticker tires and a properly tuned suspension set up will also help you put the power down more properly and help you attain more grip and traction.

A slightly more invovled means of accelerating faster deals with your driveline, notably the Transmission and Differential. Each shifting gear in your transmission has a set ratio and so does your Differential.

This mod is useful for anything that would require your 240sx to stay in the powerband and/or accelerate faster i.e. Drag Racing, Road Racing, Drifting, etc.


S13/S14 240sx Transmission Gear Ratios
1st- 3.321
2nd- 1.902
3rd- 1.308
4th- 1.000
5th- 0.759
S13/S14 240sx Differential Final Drive Gear Ratio
Final Drive- 4.083


The transmission gear ratios, in layman's terms, denotes how long or short you stay in that particular gear before you can no longer accelerate and you will have to shift in order to continue accelerating. 1st gear is relatively short, while you can hang in 5th gear for much longer accelerating.

The final drive ratio denotes how fast you can accelerate at the cost of top end speed. If the final drive number is lower it will raise your overall top speed, but you will accelerate slower through the gears. If you were originally topping out first gear at 20mph, if you installed a final drive that had a lower number for gearing, you would be able to top out much much higher than 20mph in first gear. If the final drive number is higher, you will lower your overall top speed, but you will be to accelerate faster through the gears.

You are able to swap out gears in the transmission to affect acceleration, but that is quite labor intensive, requiring a number of specific specialty tools and knowledge of disassembling and assembling transmissions.

A more effective, less time consuming, and cheaper way of affecting acceleration in this aspect is to swap out Differentials for ones with different Final Drive Ratios.

Here is a quick list of Nissan R200 Differentials and their Final Drive Ratios
S13/S14 240sx- 4.083
Z32 300zx TT- 3.692
R32 GTS-t- 4.36
R33 GTS25t- 4.363
Infiniti J30- 3.916
Nissan JDM Largo- 4.88 (certain editions)


Information that I have gathered for this post is from various sources including: www.zilvia.net, www.nicoclub.com and http://forums.freshalloy.com


Infamous 4.636 Final Drive Gear!

Cost of mod:
$100~$200 for Xterra Front Diff depending on where you procure it from

Parts Needed:

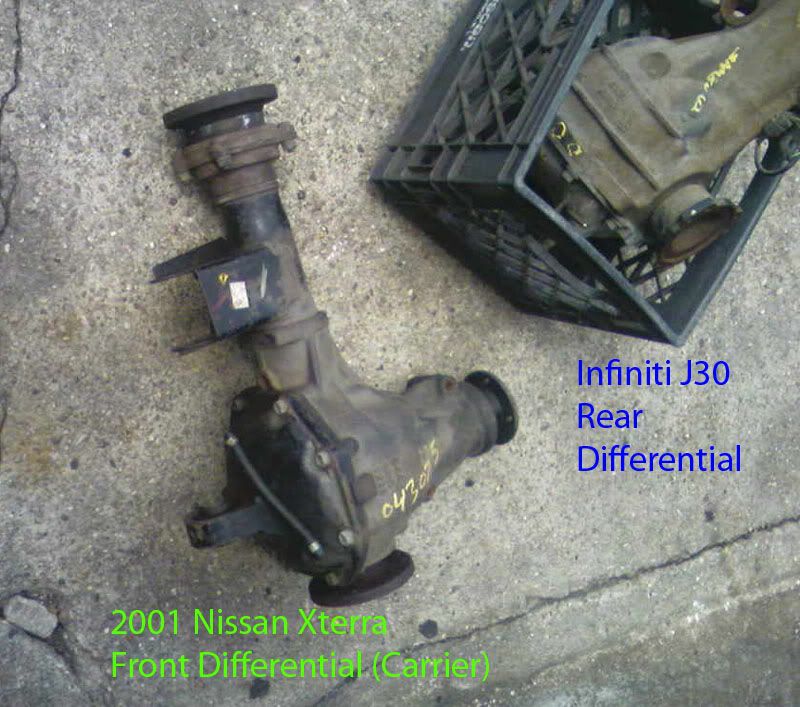
-2001 Nissan Xterra Front Differential (4.636)
-Spare (S13/S14) 240sx R200 Differential


Procedure:
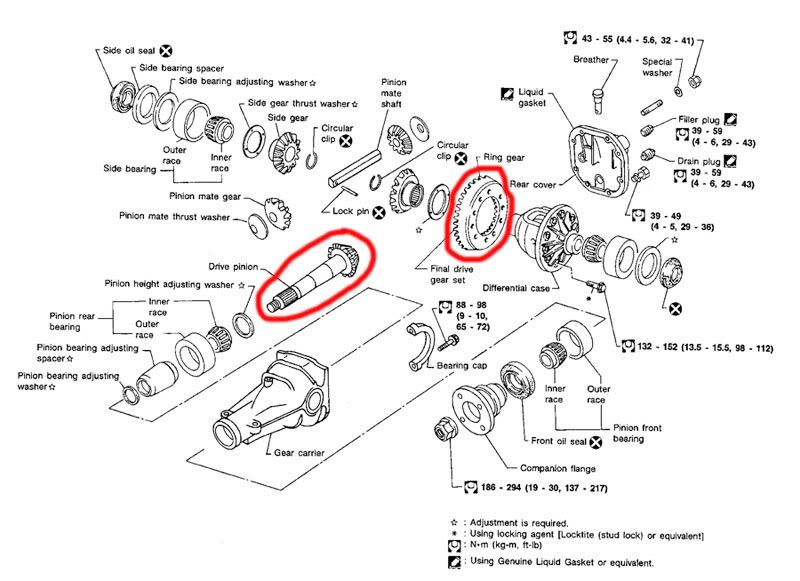
What you are doing is gutting the Nissan Xterra front differential for the Ring and Pinion Gear, then using said Ring and Pinion Gear to replace the ones from your 240sx R200 Differential. The Xterra Diff will not physically fit into your 240, but the ring and pinion will swap over.


Part Locater
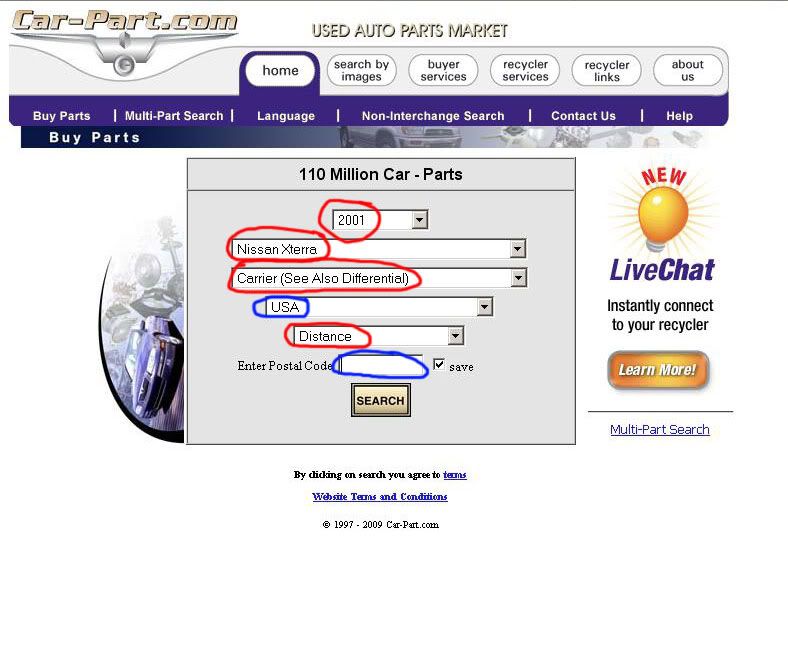
1) Enter the following url into broswer: http://www.car-part.com
2) Enter the following into the drop down boxes-
*Select Year: 2001
*Select Make/Model: Nissan Xterra
*Select Part: Carrier (See Also Differential)
*Country: Which ever country you are looking for the part in
*Distance: Distance
*Enter Postal Zip Code: The zipcode that you wish to find the part closest to
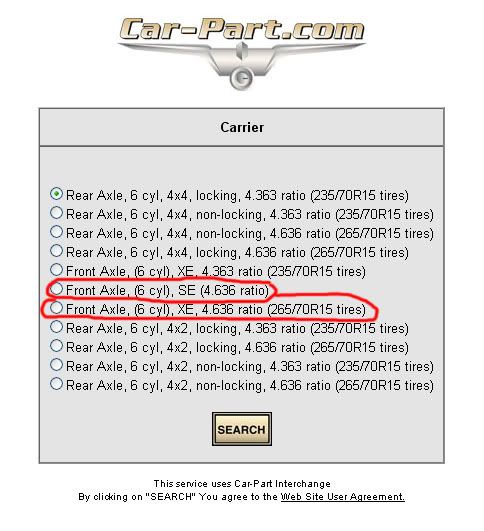
3) A screen should come up prompting which Carrier you can choose. Choose the Front Carrier with the 4.636 gearing.
4) A screen will pop up with Dismantling and Junkyards in your area with the front differential.


TIP: If you are having the diff sent to you, make sure the yard verifies the final gearing ratio by cracking open the diff casing and looking on the pinion gear for the stamped ratio.

Tuesday, April 28, 2009

Success!

My 240sx passed smog today.

Sunday, April 19, 2009

Drip Drop, Drippity Drop Drop

Hey Everyone,

This entry will discuss leaks in your S13 240sx' power steering system.

I've had Power Steering leaks of my own in my S13 240sx prompting myself to replace mine with an aftermarket piece. My Power Steering Line running from the Power Steering Pump to the Steering Rack was old, cracked and leaking.

Many of my friends that own S13 240sx' have OEM Power Steering lines go bad on them and have had problems with the OEM hardline that runs into the steering rack. I've seen a Power Steering Rack gushing with P/S Fluid from the OEM hardline... it was heartwrenching. After having to fill up my resevior twice a week, I decided to go ahead and order an aftermarket line.


The process for me to replace my power steering line was eye opening if anything. I underestimated the labor involved, didn't have the proper tools and didn't look into any diagrams before hand.

***Make sure you have your tires chocked and have a flashlight or headlight or be in a well-lit area.
***Make sure you give your car ample enough time to cool off if you've had the car running or make sure you have the proper safety equipment to prevent from being burned by hot metal bits in the engine bay, You will be working on the exhaust side of the engine bay for this.

These instructions are how to do this properly and what I should have done in the first place. These instructions are written by your truly ;).

Parts
-Fujii-SPL High Pressure Power Steering Line
-Teflon Tape

Tools
-17mm Stubby Wrench
-18mm Stubby Wrench
-19mm Stubby Wrench
-10mm Wrench (Preferably ratcheting)
-3/8 drive ratchet w/ small extension
-3/8 drive 10mm socket
-3/8 drive 12mm socket
-Appropriately sized Socket to remove P/S Line from the P/S Pump
-Breaker Bar
-Long Nose Pliers
-Drain Pan for all the P/S Fluid you will be spilling everywhere
optional
-Dremel tool w/ attachments


1) I would start by draining all the P/S Fluid from the Power Steering Reservoir located on the Exhaust Side of the engine bay

2) While the Fluid is draining, go ahead and remove the hidden 10mm bolt on the bracket that spaces out the P/S hardlines that run into the P/S Rack. The bracket it located near the Passenger Side Engine Mount. If you look down and see a rubber bushing with a metal bracket wrapped around it, use your fingers and feel along the frame and you will find a 10mm bolt.

3) After you take out the 10mm bolt, it takes a little ingenuity to get the bracket off the bushing/hardlines. The bracket wraps around the bushing and hooks back on itself where it is bolted to the frame. This is where I used my dremel with a cutting bit and cut through the top of the metal bracket and used a pair of long nosed pliers and yanked the bracket off.

4) Unplug the P/S sensor. The sensor is located where the P/S line converts over to the P/S Hard Line near the front of the vehicle.

5) Undue the brackets holding the P/S line and Hardline located near the front of the vehicle with the appropriate 10mm and 12mm sockets and ratchet

6) Use the appropriate sized socket to bust off the P/S Line off the backside of the P/S Pump. There are 2 huge bolts on the P/S Pump, a top one and one behind it, you need to bust off the one in the back facing the firewall.

7) Take a 17mm wrench and remove the P/S Line that goes to the rack. If you are on the Passenger Side Fender and look down to the P/S Rack, it's the Hardline on the left, the one closest to the nose of the vehicle.

8) After you remove the hardline nut holding the hardline to the rack you have to maneuver, shimmy the P/S line and P/S Hardline out of the engine bay... the easiest way for me was to use my dremel and a cutting disc and cut sections of the hardline and remove it in two seperate pieces.

9) Once you remove the OEM lines, now it's time to position the Fujii-SPL High Pressure Power Steering Line.

10) Make sure you Teflon the threads on all ends and fittings of the Fujii-SPL line.

11) Use a 17mm wrench to remove the other P/S Line in the rack in order to get better work clearance when you install the Fujii-SPL line.

12) Use the appropriatly sized socket to install the Fujii-SPL line into the P/S Pump. Fish the other end down to the P/S Rack.

13) Use a 19mm Stubby Wrench to tighten down the Fujii-SPL line into the steering rack and an 18mm Stubby Wrench to secure the secondary nut into the P/S Line nut.

14) Tighten to "other" P/S hardline back into the rack with a17mm wrench.


Bleeding the P/S System

1) Fill the Power Steering Resevior and take a 10-minute break.

2) Jack the front of the car up so the front wheels are not touching the ground. (use jackstands for safety!)

3) ENGINE OFF, turn the steering wheel back and forth quickly for a minute or two, contacting steering lock lightly.

4) ENGINE ON, repeat step 3.

5) ENGINE OFF, lower the front end until the tires just barely touch the ground

6) ENGINE ON, turn steering wheel back and forth numerous times and fill the reservoir if necessary.

7) ENGINE OFF, lower the car and you are ready to go!


Low and behold you have done away with leaky power steering and stupid brackets!!!

I originally did not have stubby wrenches and ended up tightening the lines going to the rack with needle nose pliers... that lasted about 2 days before the threads back out and starting pissing out P/S fluid. I recently purchased Stubby Wrenches and was able to tighten down the nuts properly.

Sorry for lack of pictures in the post. I'll make sure to try and incorporate them in future posts.


-Mainichi Tuning

Tuesday, February 17, 2009

Update

Hello All!

I've been back in the states for about a month and some change, and have been out of the Marine Corps for about as long. I've been settling down for a little bit and getting my 240sx back up to good running condition. Got a few quirks in it, but working on it little by little.

I will post up new blogs starting next week (after 23rd of February). Getting ready for a drift event on the 22nd up at Orange Show Speedway. I am currently with Team Thursday Knights and helping them coordinate events and working with their media crew.

If you have any questions, please feel free to email me at anthonyhomir@yahoo.com

I have not forgotten Mainichi Tuning... I've just been on a little hiatus. Please bear with me, and there will be new informational posts soon!!!!!


-Mainichi Tuning

Anthony Hom

My photo
San Diego, California, United States