Tuesday, December 14, 2010

Engine Set Arrived; TE72 Temp'd!!!

How's it going everyone!


Got my S14 motor/clutch/transmission set in the garage and spent 2-hours today in the DMV waiting in line to dish over a large amount of cash to get the TE72 Corolla temporarily registered for smog.

Things are starting to work out.

Let's all cross our fingers!


-Mainichi Tuning

Monday, December 6, 2010

Unforseen

So my car is down and am awaiting an S14 KA24DE to swap into it. This past weekend my engine started overheating and was burning mad oil. The engine in my car has been abused by too many owners and has done me well.

Having issues registering a 1980 TE72 Toyota Corolla. The previous owner apparently owes a lot in fees and I have to settle it out with him.

Wish me luck,
-Mainichi Tuning

Wednesday, December 1, 2010

Long Wait (Gauges and Brake Info!)

How's it going everyone!

Decided to start posting instead of waiting for a big install to put something here. I know a few of you have been waiting for awhile for me to post.


What you need to know about installing Oil Pressure and Water Temp Gauges

I feel that two of the most important engine vitals you need to keep an eye on is Oil Pressure and Water Temp. If you have low Oil Pressure, it could warn you of worn down piston rings, bad seals, failing oil pump etc. You need good oil pressure in order for your engine to operate safely at higher RPM. I choose Water Temp over Oil Temp for two reasons. When your oil is cold, your pressures are low, once the oil is to temperature, your oil pressure will be at nominal readings. I am also fairly certain that your water temp will overheat before your oil temp ever will.

I plan on running an Oil Pressure Gauge and a Water Temp Gauge on my S13 240sx (KA24DE). The Water Temp Gauge is easy because all you would need is a Radiator Hose Adapter to install the Temp Sending Unit. If you want to do a different route, I have seen thermostat housings drilled out and a bung welded for a cleaner looking install with the wires running along the engine harness. The Oil Pressure Gauge can be a little tricky though.

I am going to run a T-Fitting off of the block where the OEM Oil Pressure Sending Unit threads into so I can retain the OEM Pressure Sending Unit while having a place to mount the aftermarket pressure sending unit for the gauge.

You will need to use a 1/8" BPST FITTING! A 1/8" NPT Fitting has the same thread pitch, but the diameter is slightly different than the BPST Fitting.

Will Purchase Gauges and hopefully the fittings from Industrial Liquidators.


Brake Upgrade! (4-Luggers)

The following brake upgrade is for those 240sx owners that run small wheels (15") and want to remain 4-lug. You will not have to upgrade your Brake Mast Cylinder because the sizes of the pistons in the Front and Rear Calipers are the same and require the same amount of fluid to push them as would OEM brakes.

Fronts
1993~1997 Nissan Altima Front Calipers
1993~1997 Nissan Altima Front Rotors
1989~1999 Nissan Maxima Front Pads

Notes:
-11" Rotors.
-Everything will bolt up.
-Won't fit anything smaller than a 15" wheel. OEM Steelies WILL NOT clear the calipers.
-Need to trim or mod the Brake Dust Shield to accommodate for the larger rotor.


Rears
Z31 Nissan 300zx Rear Brake Brackets
2003 Nissan Altima Rear Rotor (would need to be re-drilled for 4x114.3)
S13/S14 Nissan 240sx Rear Brake Pads

Notes:
-11.5" Rotors.
-Setup utilizes your OEM 240sx Rear Calipers.
-Replace your 240sx rear brake brackets with the Z31 rear brake brackets. (the bracket that's between the spindle and the caliper).


Ordered Hawk HPS Pads.
Will order Rotors from Rotorpros.
Will get Z31 Rear Brake Brackets and front Altima Calipers from the Junkyard.
Will make my own steel braided lines from Industrial Liquidators.


Until Next Time,
Happy Wrenching!

-Mainichi Tuning

Monday, July 12, 2010

Change in Postings

Hey Everyone!

I usually don't post in the blog unless there are new and interesting ways to modify our 240sx'. The posts have been few and far in between due to the nature of that goal. I am now going to include modifications I do to my 240sx w/ pics so that it will keep things moving with the Mainichi Tuning Blogspot!

Cheers!


Sunday, July 11, 2010

Racking up the Miles

Just clocked over 190,000 miles on the odometer of the 240.

Sunday, July 5, 2009

Altering Acceleration

Hey everyone!

Sorry for not updating in the past few months. I've been busy working with Team Thursday Knights in San Diego on events and working on a few of my friends' 240sx's. I start school next month and should be living it easy until I get my Associate's Degree. Anyways, enough of my blibber blabber, here we go to some sick mods for you S13/S14 240sx!!!!


Final Drive: 4.636


There are different types of modifications to help you accelerate faster in your 240sx. Bolt-ons and power adders are a "No Brainer" in helping your car accelerate through more power being put down to the pavement. You can also slap on sticker tires and a properly tuned suspension set up will also help you put the power down more properly and help you attain more grip and traction.

A slightly more invovled means of accelerating faster deals with your driveline, notably the Transmission and Differential. Each shifting gear in your transmission has a set ratio and so does your Differential.

This mod is useful for anything that would require your 240sx to stay in the powerband and/or accelerate faster i.e. Drag Racing, Road Racing, Drifting, etc.


S13/S14 240sx Transmission Gear Ratios
1st- 3.321
2nd- 1.902
3rd- 1.308
4th- 1.000
5th- 0.759
S13/S14 240sx Differential Final Drive Gear Ratio
Final Drive- 4.083


The transmission gear ratios, in layman's terms, denotes how long or short you stay in that particular gear before you can no longer accelerate and you will have to shift in order to continue accelerating. 1st gear is relatively short, while you can hang in 5th gear for much longer accelerating.

The final drive ratio denotes how fast you can accelerate at the cost of top end speed. If the final drive number is lower it will raise your overall top speed, but you will accelerate slower through the gears. If you were originally topping out first gear at 20mph, if you installed a final drive that had a lower number for gearing, you would be able to top out much much higher than 20mph in first gear. If the final drive number is higher, you will lower your overall top speed, but you will be to accelerate faster through the gears.

You are able to swap out gears in the transmission to affect acceleration, but that is quite labor intensive, requiring a number of specific specialty tools and knowledge of disassembling and assembling transmissions.

A more effective, less time consuming, and cheaper way of affecting acceleration in this aspect is to swap out Differentials for ones with different Final Drive Ratios.

Here is a quick list of Nissan R200 Differentials and their Final Drive Ratios
S13/S14 240sx- 4.083
Z32 300zx TT- 3.692
R32 GTS-t- 4.36
R33 GTS25t- 4.363
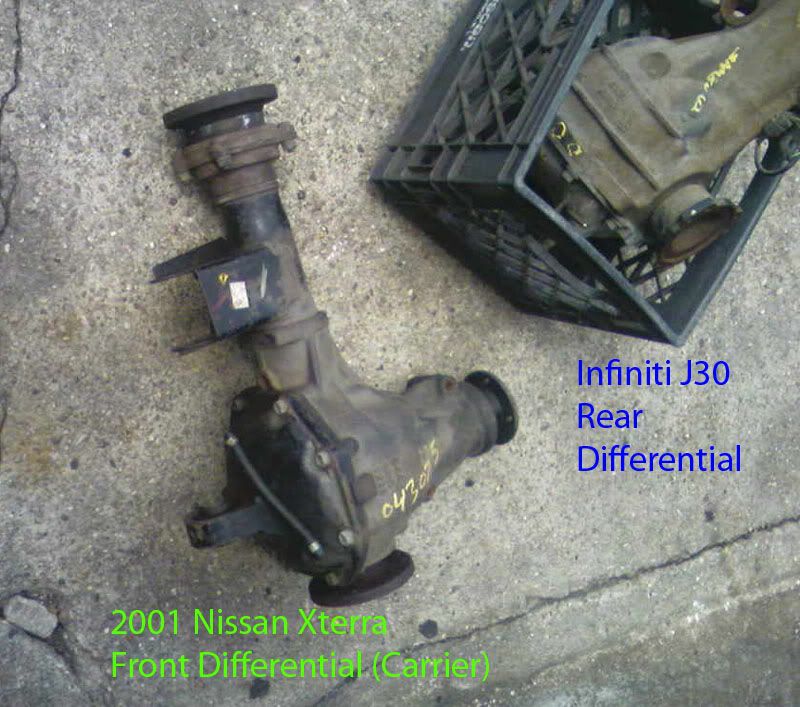
Infiniti J30- 3.916
Nissan JDM Largo- 4.88 (certain editions)


Information that I have gathered for this post is from various sources including: www.zilvia.net, www.nicoclub.com and http://forums.freshalloy.com


Infamous 4.636 Final Drive Gear!

Cost of mod:
$100~$200 for Xterra Front Diff depending on where you procure it from

Parts Needed:

-2001 Nissan Xterra Front Differential (4.636)
-Spare (S13/S14) 240sx R200 Differential


Procedure:
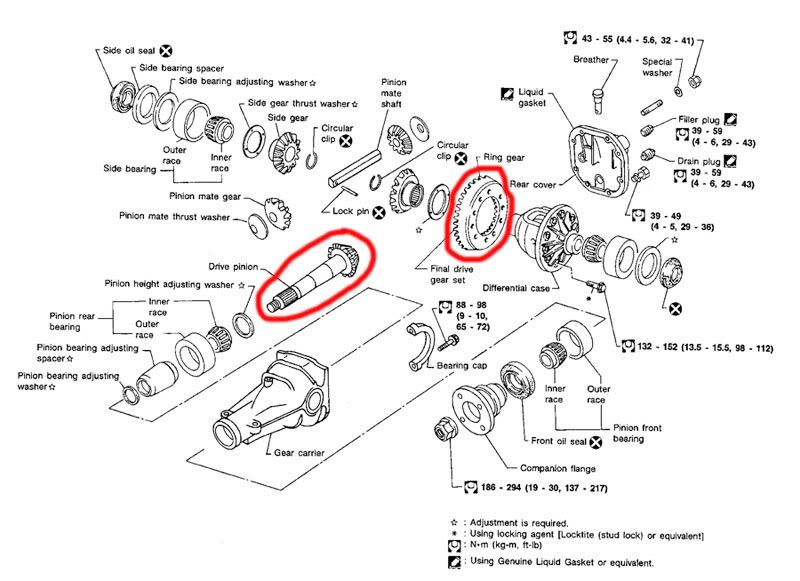
What you are doing is gutting the Nissan Xterra front differential for the Ring and Pinion Gear, then using said Ring and Pinion Gear to replace the ones from your 240sx R200 Differential. The Xterra Diff will not physically fit into your 240, but the ring and pinion will swap over.


Part Locater
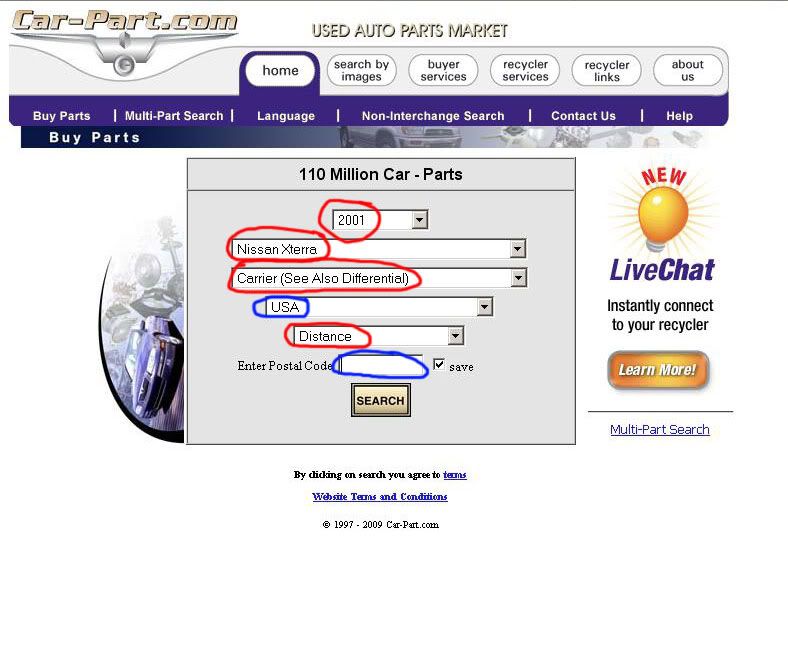
1) Enter the following url into broswer: http://www.car-part.com
2) Enter the following into the drop down boxes-
*Select Year: 2001
*Select Make/Model: Nissan Xterra
*Select Part: Carrier (See Also Differential)
*Country: Which ever country you are looking for the part in
*Distance: Distance
*Enter Postal Zip Code: The zipcode that you wish to find the part closest to
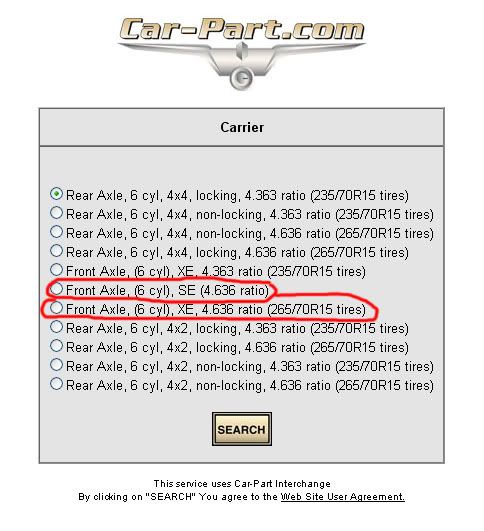
3) A screen should come up prompting which Carrier you can choose. Choose the Front Carrier with the 4.636 gearing.
4) A screen will pop up with Dismantling and Junkyards in your area with the front differential.


TIP: If you are having the diff sent to you, make sure the yard verifies the final gearing ratio by cracking open the diff casing and looking on the pinion gear for the stamped ratio.

Tuesday, April 28, 2009

Success!

My 240sx passed smog today.

Anthony Hom

My photo
San Diego, California, United States