Monday, January 3, 2011

Sunday, January 2, 2011
TE72
Tuesday, December 14, 2010
Engine Set Arrived; TE72 Temp'd!!!
Monday, December 6, 2010
Unforseen
Wednesday, December 1, 2010
Long Wait (Gauges and Brake Info!)
Monday, July 12, 2010
Change in Postings
Sunday, July 11, 2010
Sunday, July 5, 2009
Altering Acceleration
Sorry for not updating in the past few months. I've been busy working with Team Thursday Knights in San Diego on events and working on a few of my friends' 240sx's. I start school next month and should be living it easy until I get my Associate's Degree. Anyways, enough of my blibber blabber, here we go to some sick mods for you S13/S14 240sx!!!!
Final Drive: 4.636

There are different types of modifications to help you accelerate faster in your 240sx. Bolt-ons and power adders are a "No Brainer" in helping your car accelerate through more power being put down to the pavement. You can also slap on sticker tires and a properly tuned suspension set up will also help you put the power down more properly and help you attain more grip and traction.
A slightly more invovled means of accelerating faster deals with your driveline, notably the Transmission and Differential. Each shifting gear in your transmission has a set ratio and so does your Differential.
This mod is useful for anything that would require your 240sx to stay in the powerband and/or accelerate faster i.e. Drag Racing, Road Racing, Drifting, etc.
S13/S14 240sx Transmission Gear Ratios
1st- 3.321
2nd- 1.902
3rd- 1.308
4th- 1.000
5th- 0.759
S13/S14 240sx Differential Final Drive Gear Ratio
Final Drive- 4.083
The transmission gear ratios, in layman's terms, denotes how long or short you stay in that particular gear before you can no longer accelerate and you will have to shift in order to continue accelerating. 1st gear is relatively short, while you can hang in 5th gear for much longer accelerating.
The final drive ratio denotes how fast you can accelerate at the cost of top end speed. If the final drive number is lower it will raise your overall top speed, but you will accelerate slower through the gears. If you were originally topping out first gear at 20mph, if you installed a final drive that had a lower number for gearing, you would be able to top out much much higher than 20mph in first gear. If the final drive number is higher, you will lower your overall top speed, but you will be to accelerate faster through the gears.
You are able to swap out gears in the transmission to affect acceleration, but that is quite labor intensive, requiring a number of specific specialty tools and knowledge of disassembling and assembling transmissions.
A more effective, less time consuming, and cheaper way of affecting acceleration in this aspect is to swap out Differentials for ones with different Final Drive Ratios.
Here is a quick list of Nissan R200 Differentials and their Final Drive Ratios
S13/S14 240sx- 4.083
Z32 300zx TT- 3.692
R32 GTS-t- 4.36
R33 GTS25t- 4.363
Infiniti J30- 3.916
Nissan JDM Largo- 4.88 (certain editions)
Information that I have gathered for this post is from various sources including: www.zilvia.net, www.nicoclub.com and http://forums.freshalloy.com
Infamous 4.636 Final Drive Gear!
Cost of mod: $100~$200 for Xterra Front Diff depending on where you procure it from
Parts Needed:
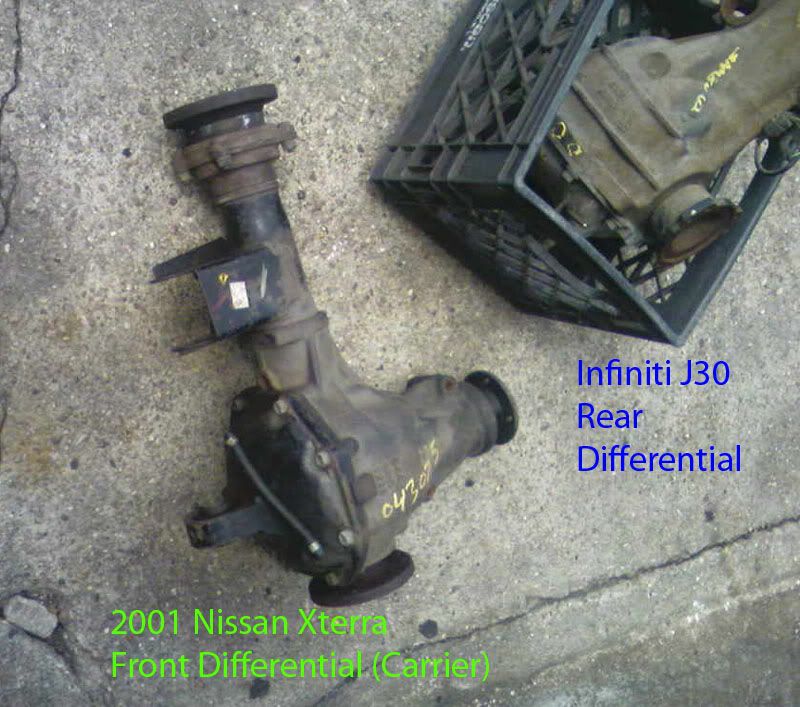
-2001 Nissan Xterra Front Differential (4.636)
-Spare (S13/S14) 240sx R200 Differential
Procedure:
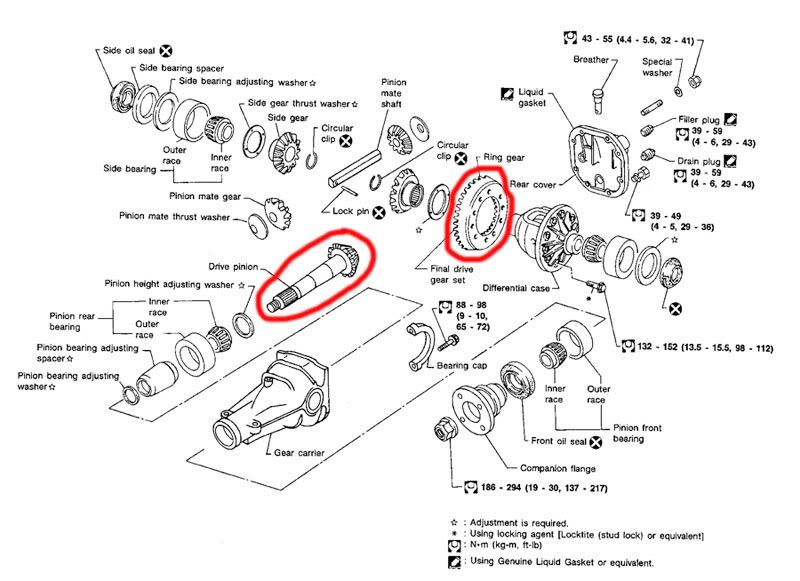
What you are doing is gutting the Nissan Xterra front differential for the Ring and Pinion Gear, then using said Ring and Pinion Gear to replace the ones from your 240sx R200 Differential. The Xterra Diff will not physically fit into your 240, but the ring and pinion will swap over.
Part Locater
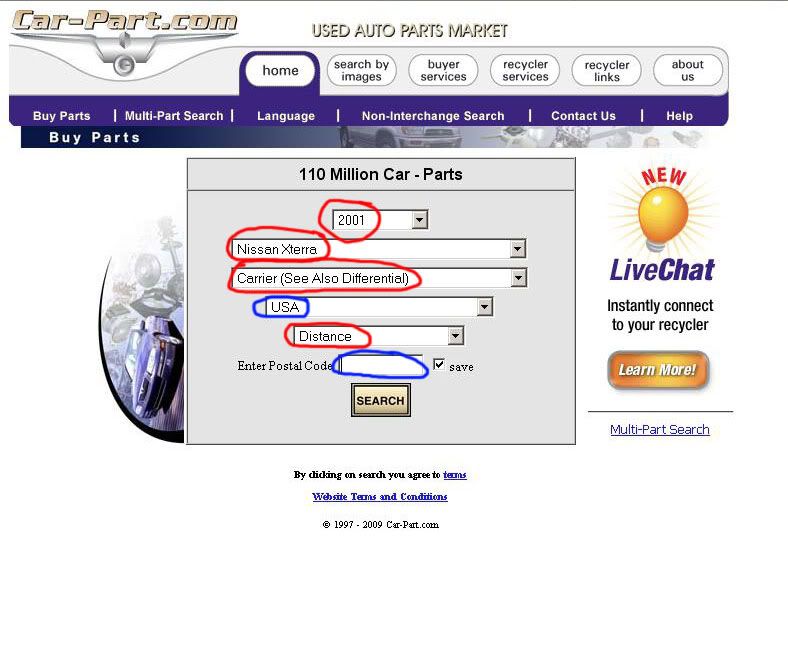
1) Enter the following url into broswer: http://www.car-part.com
2) Enter the following into the drop down boxes-
*Select Year: 2001
*Select Make/Model: Nissan Xterra
*Select Part: Carrier (See Also Differential)
*Country: Which ever country you are looking for the part in
*Distance: Distance
*Enter Postal Zip Code: The zipcode that you wish to find the part closest to
3) A screen should come up prompting which Carrier you can choose. Choose the Front Carrier with the 4.636 gearing.
4) A screen will pop up with Dismantling and Junkyards in your area with the front differential.
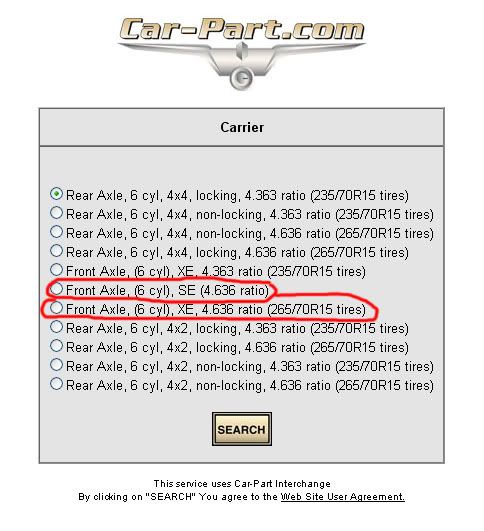
TIP: If you are having the diff sent to you, make sure the yard verifies the final gearing ratio by cracking open the diff casing and looking on the pinion gear for the stamped ratio.
Tuesday, April 28, 2009
Sunday, April 19, 2009
Drip Drop, Drippity Drop Drop
This entry will discuss leaks in your S13 240sx' power steering system.
I've had Power Steering leaks of my own in my S13 240sx prompting myself to replace mine with an aftermarket piece. My Power Steering Line running from the Power Steering Pump to the Steering Rack was old, cracked and leaking.
Many of my friends that own S13 240sx' have OEM Power Steering lines go bad on them and have had problems with the OEM hardline that runs into the steering rack. I've seen a Power Steering Rack gushing with P/S Fluid from the OEM hardline... it was heartwrenching. After having to fill up my resevior twice a week, I decided to go ahead and order an aftermarket line.
The process for me to replace my power steering line was eye opening if anything. I underestimated the labor involved, didn't have the proper tools and didn't look into any diagrams before hand.
***Make sure you have your tires chocked and have a flashlight or headlight or be in a well-lit area.
***Make sure you give your car ample enough time to cool off if you've had the car running or make sure you have the proper safety equipment to prevent from being burned by hot metal bits in the engine bay, You will be working on the exhaust side of the engine bay for this.
These instructions are how to do this properly and what I should have done in the first place. These instructions are written by your truly ;).
Parts
-Fujii-SPL High Pressure Power Steering Line
-Teflon Tape
Tools
-17mm Stubby Wrench
-18mm Stubby Wrench
-19mm Stubby Wrench
-10mm Wrench (Preferably ratcheting)
-3/8 drive ratchet w/ small extension
-3/8 drive 10mm socket
-3/8 drive 12mm socket
-Appropriately sized Socket to remove P/S Line from the P/S Pump
-Breaker Bar
-Long Nose Pliers
-Drain Pan for all the P/S Fluid you will be spilling everywhere
optional
-Dremel tool w/ attachments
1) I would start by draining all the P/S Fluid from the Power Steering Reservoir located on the Exhaust Side of the engine bay
2) While the Fluid is draining, go ahead and remove the hidden 10mm bolt on the bracket that spaces out the P/S hardlines that run into the P/S Rack. The bracket it located near the Passenger Side Engine Mount. If you look down and see a rubber bushing with a metal bracket wrapped around it, use your fingers and feel along the frame and you will find a 10mm bolt.
3) After you take out the 10mm bolt, it takes a little ingenuity to get the bracket off the bushing/hardlines. The bracket wraps around the bushing and hooks back on itself where it is bolted to the frame. This is where I used my dremel with a cutting bit and cut through the top of the metal bracket and used a pair of long nosed pliers and yanked the bracket off.
4) Unplug the P/S sensor. The sensor is located where the P/S line converts over to the P/S Hard Line near the front of the vehicle.
5) Undue the brackets holding the P/S line and Hardline located near the front of the vehicle with the appropriate 10mm and 12mm sockets and ratchet
6) Use the appropriate sized socket to bust off the P/S Line off the backside of the P/S Pump. There are 2 huge bolts on the P/S Pump, a top one and one behind it, you need to bust off the one in the back facing the firewall.
7) Take a 17mm wrench and remove the P/S Line that goes to the rack. If you are on the Passenger Side Fender and look down to the P/S Rack, it's the Hardline on the left, the one closest to the nose of the vehicle.
8) After you remove the hardline nut holding the hardline to the rack you have to maneuver, shimmy the P/S line and P/S Hardline out of the engine bay... the easiest way for me was to use my dremel and a cutting disc and cut sections of the hardline and remove it in two seperate pieces.
9) Once you remove the OEM lines, now it's time to position the Fujii-SPL High Pressure Power Steering Line.
10) Make sure you Teflon the threads on all ends and fittings of the Fujii-SPL line.
11) Use a 17mm wrench to remove the other P/S Line in the rack in order to get better work clearance when you install the Fujii-SPL line.
12) Use the appropriatly sized socket to install the Fujii-SPL line into the P/S Pump. Fish the other end down to the P/S Rack.
13) Use a 19mm Stubby Wrench to tighten down the Fujii-SPL line into the steering rack and an 18mm Stubby Wrench to secure the secondary nut into the P/S Line nut.
14) Tighten to "other" P/S hardline back into the rack with a17mm wrench.
Bleeding the P/S System
1) Fill the Power Steering Resevior and take a 10-minute break.
2) Jack the front of the car up so the front wheels are not touching the ground. (use jackstands for safety!)
3) ENGINE OFF, turn the steering wheel back and forth quickly for a minute or two, contacting steering lock lightly.
4) ENGINE ON, repeat step 3.
5) ENGINE OFF, lower the front end until the tires just barely touch the ground
6) ENGINE ON, turn steering wheel back and forth numerous times and fill the reservoir if necessary.
7) ENGINE OFF, lower the car and you are ready to go!
Low and behold you have done away with leaky power steering and stupid brackets!!!
I originally did not have stubby wrenches and ended up tightening the lines going to the rack with needle nose pliers... that lasted about 2 days before the threads back out and starting pissing out P/S fluid. I recently purchased Stubby Wrenches and was able to tighten down the nuts properly.
Sorry for lack of pictures in the post. I'll make sure to try and incorporate them in future posts.
-Mainichi Tuning
Tuesday, February 17, 2009
Update
I've been back in the states for about a month and some change, and have been out of the Marine Corps for about as long. I've been settling down for a little bit and getting my 240sx back up to good running condition. Got a few quirks in it, but working on it little by little.
I will post up new blogs starting next week (after 23rd of February). Getting ready for a drift event on the 22nd up at Orange Show Speedway. I am currently with Team Thursday Knights and helping them coordinate events and working with their media crew.
If you have any questions, please feel free to email me at anthonyhomir@yahoo.com
I have not forgotten Mainichi Tuning... I've just been on a little hiatus. Please bear with me, and there will be new informational posts soon!!!!!
-Mainichi Tuning
Sunday, November 30, 2008
Thank you Aaron
If you would like to post a comment, you do not have to be a blogspot user, all you have to do is click on the "comment" link and type away.
I'm currently getting ready to pack for my move back to California from Okinawa. I may or may not have time to post up anything new or cool till I get a few things handled and out of the way. I will post when I have free time though.
Hope everyone stateside had a Happy Thanksgiving and got fat and happy off all that turkey and ham!
-Mainichi Tuning
Tuesday, November 11, 2008
Mix and Match
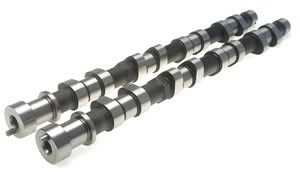
Camshafts are the long metal rod-like objects that run the length of your engine within the valvetrain of your cylinder head. Camshafts have lobes that have an egg-shaped profile when you look at from a lengthwise view. The lobes push down on your intake and exhaust valves inside the cylinder head allowing air to enter your engine's combustion chambers and to let exhaust gases exit your combustion chambers.
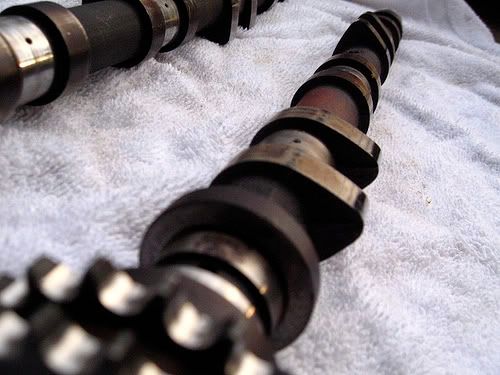
Camshafts are measured in duration (the taller the height of the lobe = the valves are open longer allowing more air to enter and exit the combustion chambers). Stock camshafts from factory are generally mild and are designed with fuel economy and driveability in mind. More aggressive camshafts have higher duration lobes and are used to alter your engine's powerband. When I say altering your powerband, I'm talking about where your engine makes power along the RPM range. If you have crazy high duration cams, you need to rev higher in order to access and utilize the powerband which has been moved up the RPM range.
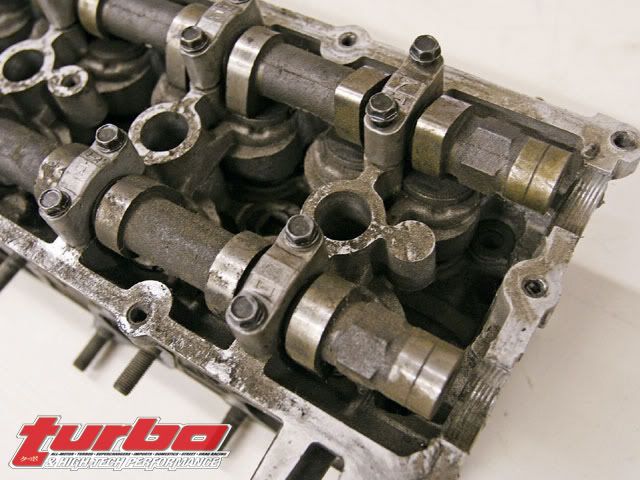
Mad High Duration Cams = Revving higher in order to make power. Applications with very high duration cams usually have balanced and blue printed engine internals, upgraded valvetrain, ported and polished headwork, ecu tuning, etc in order to safely rev at higher rpm.
Having an engine that revs that high, you most likely will kiss emissions goodbye and low-rpm driveability out the window.
Mild Duration Cam set ups are used to compliment an engine's powerband and alter it slightly in order for power to be made across a larger portion of the rev range including a combination of low and mid or mid and high rpm.
KA24DE Cams
There is a total of 3 different cam durations for the KA24DE engines coming from the S13 and S14 240sx.
S13 240sx
Intake: 240 degrees
Exhaust: 248 degrees
S14 240sx
Intake: 232 degrees
Exhaust 232 degrees
DjPantsSpecR from Nicoforums has attributed his findings through vigorous testing of different stock cam combinations to KA24DE engines with both the 4-speed automatic and 5-speed manual transmissions. Gearing is different between the automatic and manual transmissions. Certain combinations will work better for an automatic vs the manual and vice-versa.
my comments on 248/240 s13 cam swap
by DjPantsSpecR
[excerpts]
The following are cam duration combos labeled as such:
***/***
The first 3-digit number denotes the Intake Camshaft Duration and the second 3-digit number denotes the Exhaust Camshaft Duration
248/248 is by far my least favorite cam swap. there is a noticeable loss in low end, and the motor never rev's high enough to take too much advantage of the additional top end power. I'm not saying the top end isn't there, it just really only starts pulling until right before 6000 rpm, and pulls to 7000. then you hit the rev limiter and crave for a few more revs. maybe an automatic ecu and 7200 rpm might be beneficial, but i love to rev it out and i shouldn't be allowed to have 200 more rpm. if i had a more top end oriented motor 248/248 would be a great thing to have, but until i can afford it, i wont ever use it again. the sound you get from this beast is nice though
240/248 is obviously stock, its been a while since I've actually had a car with 240/248. but from what i remember the low end is decent but it does fall on its face in the top end. the 248 exhaust cam is trying to make top end power, but the 240 intake cam is trying to provide more all-around power, not just low or top end. i don't like it because of how bad it falls on its face before even 6500
232/232 i never tried, but i got em so i could.... but come on 232/232?
240/240 has a really snappy low end, probably the best low end I've tried, and its the only times I've ever spun the tires into second gear in the automatic, granted its gotta be wet outside... any who, 240/240 is what I'm directly comparing to 248/240 here. 240/240 has a nice pull even in the top end, and power is quite prominent in the 4000 rpm area. I'm still a big fan of 240/240 and I'd like to try it on my manual car, but that car already has the hands down best stock cam swap possible....
248/232 this is hands-down where its at. If you have some s13 cams and some s14 cams you should have already done this. the power production is great everywhere. you only lose a little bit of top end over 248/248 and you gain more low end than you get with any other swap besides maybe 232/232. the KA craves this swap, it loves the low end and, chances are you only rev to 6500 anyway, so that's why this is the cam swap for you. only don't do this if you wanna get beat by me. I'm only kidding, I'm too poor to be fast.
248/240 you read all that crap just to get to here so here it is. coming from 240/240 in a nearly stock automatic car, I'm very disappointed. the only major difference is a slight gain in top end, maybe 2hp, but the loss of low end is noticeable. I'd rather have that torque back for this daily driver than the slight bump i got in top end. granted this car is actually proven quicker now than the 240/240 car, but its less satisfying. everyone wants to be put into the back of their seat right away, not eventually.....
sound in 248/248 sounds the best, but 248/232 sounds 100% different, and also quite beautiful. idle with 248/240 sucks, but its nice because its honestly lobing so it give the illusion of a fast auto....
EDIT: okay this is the only swap i think i didn't touch yet, and you wont even hear about for many posts down. Some of the posts in this thread are kinda off topic, but MANY MANY are very useful, and there is a large discussion independent of this thread by tloof that you can search for...
240/232 this is what i just put in my automatic car. I'm a huge fan of the low end here, and its better than 240/240. the overlap is always off by about 2 degrees or so when you use an intake cam used as an exhaust cam or vice-versa. So for that reason, 240/232 works very nice. i can tell it doesn't have quite as much pull in the top end as 248/232 but its part-throttle driveability is great. you really only feel the low end torque when you are at part-throttle anyways, so you need to make a decision....
240/232 is great for a daily driver, where low end torque is favored over top end merging power. in the automatic, after shifts the car has noticeably more power than it does with 248/232. I would say if you have an automatic get the 240/232 because you spend more time in the mid range because of your gearing.
248/232 is for the manual car. I've gone to and from this cam swap in both cars at least five or six times, and i always come back. its the best there is, and its greater than stock. its ideal for forced induction, and its cheap to do. i can imagine this swap would be even more devastating with a re-drilled cam gear.
248/248 is something I'm going to look at again with my current setup on the manual car. (re-drilled cam gear, intake manifold, SAFC, 3in exhaust, and dc sports header) it doesn't do any good in the auto, the loss in mid and low end isn't worth it. I've seen a dyno of 248/232 vs 248/248 and the difference in top end is something like 2hp, but the difference in mid range is 6 peak hp and all kinds of torque.....
-Mainichi Tuning
S13 Firewalls
Wednesday, October 29, 2008
Taking a little break
Saturday, October 4, 2008
Engine Management
Making more power out of your engine can be done through many different ways. You can slap some bolt-on power-adders, add forced induction to a naturally aspirated engine, upping the compression ratio of your engine through upgraded cylinder block internals, port and polishing your cylinder head, etc. In order to make these power adders as effective as possible, it is necessary to tune your engine for the parts. Tuning an engine, in simple terms, lets the engine run making the most power as safely as possible or as to your liking.
On modern day fuel injected vehicles, the engine is controlled by the ECU. The ECU is the brain of your car. It controls the rate your fuel injectors are opening and closing, it reads what position your camshafts are at, it controls spark for your spark plugs through your distributor, it reads how much air is coming past your MAF sensor or the MAP in your Intake manifold, it controls your Air Conditioning unit, etc.
Now comes the issue of controlling what your ECU is doing. A stock factory ECU (for a majority of vehicles) is coded/encrypted so that you can't go in and plug it up straight to a computer and start changing values for fuel mapping and timing tables.
ECU Tuning comes in 3 flavors. Chipping, Piggyback, and Full Stand Alone.
Chipping, or ECU flashing is a process where you would send in your ECU to a company or a programmer that would load new settings onto a chip in your ECU through an Emulator. The problem with Chipping/ECU flashing is that they are usually mass produced and/or have a limited depth of precise tuning to your specific setup. Companies that offer these services most often guarantee HP/Tq gains as well as an increase in gas mileage on a stock vehicle, usually through more aggressive fuel and timing maps. These are good for vehicles with very limited aftermarket (aka Brand New Cars) or for a very mild tune car. Chipping and ECU flashing overall is a cheap way to lightly tune your vehicle
Piggyback ECU's and devices are more expensive than chipping and less expensive than Stand Alone Engine Management. Fuel Computers read and intercept the signal running from your fuel injectors and alter the signal giving off "fake" voltage readings so that the ECU is tricked into thinking it's giving either too much fuel or too little fuel and sends the corresponding information to the injectors accordingly. Some piggyback ECUs can alter the redline of the vehicle, effectively letting you set the rev limiter so that your car can rev higher (really only needed if your engine is modified for it's powerband to operate at higher RPMs). Some piggyback ECUs can also control ignition timing and other aspects of engine operation. The downside of piggyback ECUs is that they are not designed to completely take over all engine operation. They are designed to be used with the factory ECU as a base and alters signals received and sent from the factory ECU. Piggyback ECUs do not have the amount of flexibility and tuning range that a Full Stand Alone Engine Management system has. I would recommend the use of Piggyback ECUs and devices only when Full Stand Alone Engine Management Systems are not available for you car or when it is far too expensive or out of your budget or not cost effective for your project vehicle to run a Stand Alone system.
Examples of Piggyback Devices would be the Apex'i SAFC/VAFC, HKS Speed Cut Defencer, Fuel Cut Defencer, Innovate Motorsports LM-1, etc.
The mother of all tuning is Full Stand Alone Engine Management Systems. These tuning solutions more than likely replace the entire ECU for an aftermarket ECU that plugs up to the OEM connectors. Other stand alone engine management systems use OEM ECU Chips that have been de-crypted or un-coded so that all aspects of the ECU mapping and settings can be changed. Other systems use board combinations that de-crypt and uncode the factory ECU and are installed inside the ECU. They are usually outfitted with ports that can be plugged directly to a laptop for real-time tuning. Stand Alone Engine Management Systems is the best for of engine tuning allowing you to tune every aspect of your car that is electronically controlled by the ECU. The main difference between piggyback systems and Stand Alone is that you have many more options and flexibility. For example, a piggyback fuel computer can tune say 10 separate points along the RPM range, while a Stand Alone may be able to map 32+ seperate load points along the RPM range. It's like trying to cut a tomato with a sharp knife compared to a hammer, you'll be able to tune the vehicle more precisely with a Stand Alone.
Examples of Full Stand Alone Engine Management Systems would be AEM EMS, Nistune, [to an extent] Apex'i Power FC, SDS EMS, etc.
-Mainichi Tuning
Saturday, September 27, 2008
180sx Tear Down
-Mainichi Tuning
Wednesday, September 10, 2008
The White Bunny Special
Follow the White Rabbit...
Here in Japan there are a lot of great places to get second hand parts for cars, especially Nissans. I see *used* Super Single Clutch kits selling on Yahoo Auction Japan for as a little as $150. Friends would sell stock SR engines w/ aftermarket clutch set ups as well as all necessary wiring and ECU for less than 7 bills.

I've searched the American auction sites like eBay and have found very few used aftermarket clutch set ups. I've instead found F1 Racing Clutches, many no-name company clutches which mix composites such as Carbon Fiber and Ceramic into their clutch materials. These organizations sell these clutch sets for around the $150~$300 in new condition. There's the saying "You get what you paid for" =/. Haven't had much experience with the products of these "new" companies, but for such a cheap price... I am very wary of putting such parts on my car. I would put little gadgets and materials I purchase off eBay for my car, but for something as important as the Driveline, I try and shy away from anything that can wreck havoc on adjacent parts because I wanted to cheap out on using quality parts.

The purpose of an aftermarket clutch is to complement added horsepower you have or plan to make. The stock clutch of your vehicle is rated to handle only so many ft/lbs of torque. When you make more power with your engine, it will produce more ft/lbs of torque and likely turn your stock clutch into strands of organic spaghetti. An aftermarket clutch is designed to handle increased torque as well as provide more feedback to the driver of the workings of the driveline from the bottom of their left foot.
Video of Destroyed Clutch
There are good quality parts companies that provide support in the form of aftermarket clutches to the U.S.-Spec 240sx. Exedy, ACT (Active Clutch Technologies), Centerforce, Clutchmasters, etc. These companies have basic upgraded clutches which start around the $300 mark and above depending if you are getting a more serious set up involving Super Single kits or Multi-Disc setups.

This is where the White Bunny comes in. The phrase "White Bunny" refers to the 1998 White 240sx Turbo SE owned by s14turbose of 240sxforums. The White Bunny Clutch Set Up uses a mix of Nissan/Datsun clutch and driveline parts that act as an aftermarket clutch kit.
The KA-series engine uses a 225mm Clutch Disc while the White Bunny Clutch Setup uses a 240mm Clutch Disc. With a wider diameter clutch disc, this would, in theory, give you more of a usable area that your clutch can engage compared to the smaller clutch disc and give you more room to play with horsepower.
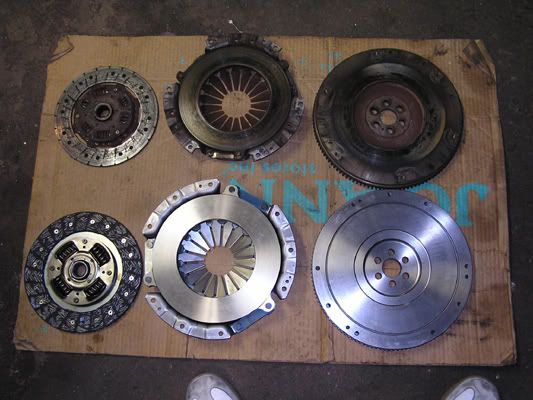
Parts include:
Nissan D21 Truck Flywheel
Nissan 280Z Turbo/Z31 300zx/any Nissan clutch disc that has a surface area of 240mm along with clutch cover
240sx/Z32 Throw Out Bearing
240sx M/T Pilot Bearing
A few extra clutch cover bolts.
This setup will cost around $215 or less depending on where you get the parts. It was suggested to me by BigGameHit to use www.thepartsbin.com for the clutch and clutch cover.
The following write-up is from BigGameHit on NicoForums borrowed from 240sxAddict on 240sxForums
240sx white bunny clutch setup
Yup well after more research i went with this setup, i would explain, but ill just show the facts from another buddies setup. I have had a mixture of different clutches over the years ranging from oem to ACT Xtream. i just like to try new things. my current setup with lighten flywheel is failing becuase of Weak Diaphragm.
---
(taken from 240sxforums 240sxAddict/creator from another forum)
The "White Bunny Special" was first created and explained by s14turbose, the "white bunny" being his 98 S14 turbo SE. KA24's come stock with a 225mm clutch surface area, but using parts from other nissans allows you to run a 240mm clutch, which by logic gives you more tractable area for the clutch to grab onto thus reducing the chance of slippage.
We used the flywheel of a 1993 D21 Pickup(4 cylinder model), which is the standard flywheel to use because it carries the same crank bolt pattern as our cranks but is a 240mm flywheel. I believe any year will work, 87 being a common year people use but to play it safe use the 93 because I just installed one and it fit fine. There is also talk of lightened 240mm flywheels, but I have yet to see any that arent custom made.
Now the pressure plate and clutch disc are varied. We used the stock setup of the afor-mentioned 93 D21, but common clutches used are off the 280Z Turbo, the 300ZX Turbo, and the RB series clutches. You can use both aftermarket and stock as long as it is 240mm. But one rumor surrounding this special is the truck and 280Z clutch can hold balls of torque, some saying near 400ft/lbs and they still retain stock pedal feel and longer life than aftermarket clutches. I'm still searching for the answer, but I read it went on Mike Lee's T66 KAT, and it had no problems holding 500rwhp.
One very important point is that the 240mm clutch uses 9bolts to hold the pressure plate onto the flwheel, while your stock uses 6. Be sure to pick some up before you attempt this. Also, you'll have to break the small pin on the crank off to bolt up the flywheel, as it has no slot for it.
Update:installation pictures
after about 2 cans of brake cleaner still had 2more to go

as a result of not running my dust cover this happen. i thought it would help with cooling, but was I wrong..................yup

more size difference pics


tools used to remove old worn pilot bearing for act bearing


putting new setup on
the little bulge that you see at the bottom of the dust cover is what the flywheel will grind down. when the noise has stopped, you will be able to insert your bolts at the bottom of the bell housing. after that, more noise will sound for about 1 minute. after that your all go.


My pictures ( total price $215 dollars)


- Mainichi Tuning
Monday, September 8, 2008
Ticking Time Bombs
The DOHC KA timing chains are located in front of the engine. They are wrapped around the camshafts, distributor gear and crank gears. Excessive movement of the timing chain is kept in check by the timing chain cover, timing chain guides and a tension side guide.
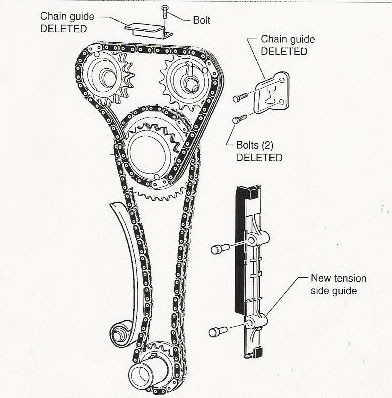
(Photo is of a Nissan Altima Timing Chain,Tension guide is located on the opposite side for the DOHC KA)
The problem with the timing chain guides is that they make a ticking sound near the front of your engine because they are smacking up against the guides. When metal smacks against metal enough, it will start wearing the metal down. As soon as it wears down, metal will break off and bits of metal getting caught in your timing chain between any of the gears behind the timing cover will cause skipping of teeth which will lead to a severely damaged engine through the form of engine detonation.
The Solution?
Remove the upper and side timing chain guides. It's easy and anyone that can follow simple instructions can do it.
For the following DIY Instructions are a combination of:
Text and Photos from ILikeMy240sx @ NicoForums
Photos from BigGameHit's Writeups @ his personal site
HOW-TO: Fix Your Timing Chain Rattle
Introduction:
There are three possible reasons why your timing chain is making the rattling noise.
1. Oil pressure is low: The tensioners that keep the timing chain tight are operated by oil pressure so if your oil pressure is low then the tensioner will not be working properly hence your chain will flap around and hit the guides.
2. Tensioner is stuck: If you have alot of oil gunk on your tensioner then the tensioner will be stuck and not extend out all the way to keep the timing chain tight.
3. Tensioner is broken: If your tensioner is mechanically broken then you need to replace it.
Having said that, before you follow this write-up it is a good idea to check your oil pressure. Also, in this write up I will not go over how to replace the tensioner but rather tell you how to clean it while it's still installed.
Difficulty: On a scale from 1~5 (5 being the hardest): 2/5
Time: Approximately 3 hours. Assuming you have no previous experience.
Tools:
-Metric Sockets including 27mm for the crank bolt
-Ratchet and wobble extensions
-Screwdriver
-Torque wrench
-Breaker bar (not necessary)
-Timing Light
-RTV Liquid Gasket
Procedures:
1. Set your #1 piston at TDC on compression stroke
-NOTE: You can tell you are at TDC on compression stroke by looking at the cams. As seen in the picture of the cams below, exhaust and intake cam lobes for #1 cylinder should be facing outward. So you might want to open the valve cover first then rotate the crank pulley. If the #1 cylinder cams are facing inwards then just rotate your pulley another 360 degrees until they are facing outwards.
-Jack up your car and crawl under your car
-Take a 27mm socket and a breaker bar and rotate the crank pulley clockwise using the crank bolt.
-Match the notches on the crank pulley with the needle as shown.
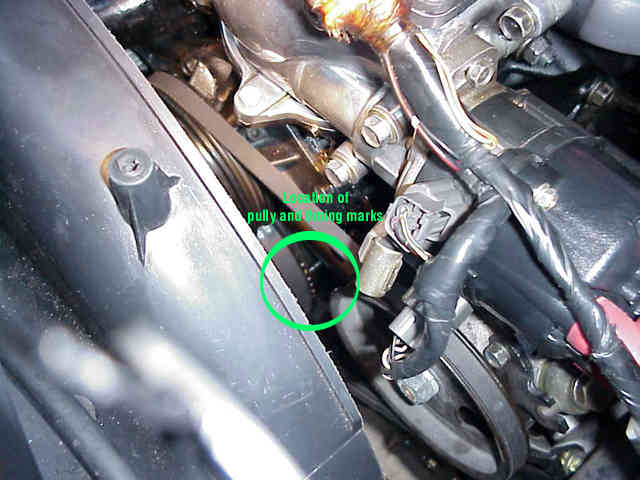
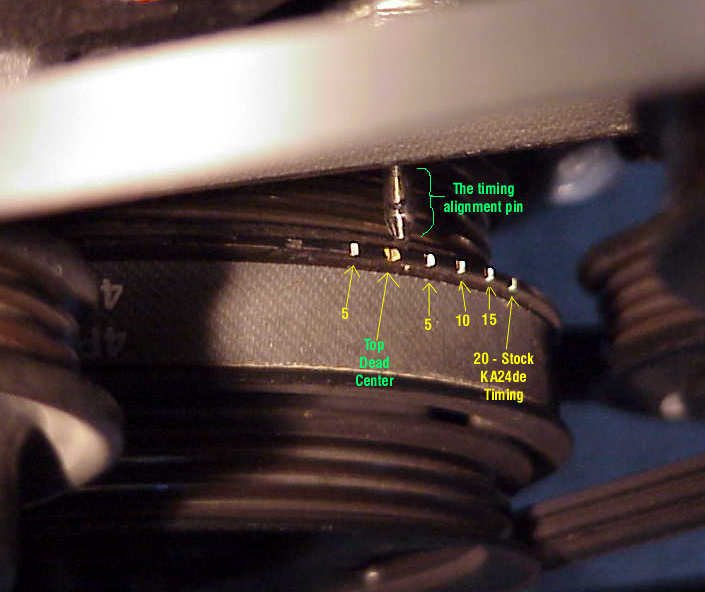
-Lower your car
2. Take off the valve cover
-Remove the spark plug wires.
-Loosen bolts as shown below.
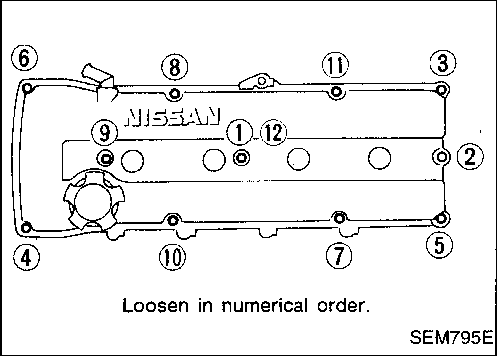
-The bolts closest to the firewall might be a bit hard to get to because of wires and brake lines but try to push those away and wobble extension will help.
3. Remove the upper timing chain guide #1
-Note here the position of the cam lobes on #1 cylinder. They are facing outwards which means its at TDC on compression stroke. If the #1 cylinder cams are facing inwards then just rotate your pulley another 360 degrees until they are facing outwards.
-Remove the two bolts circled in yellow
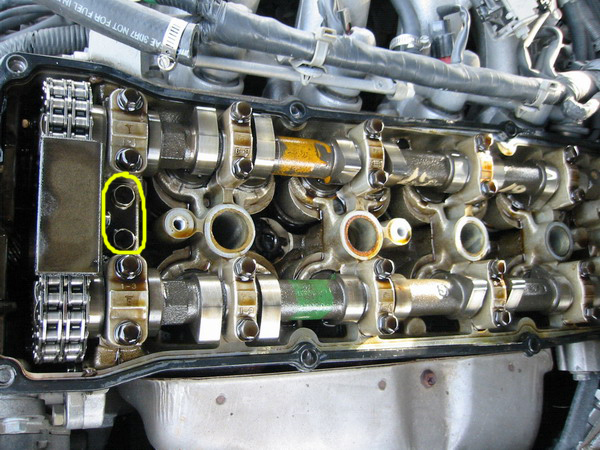
-What my guide looked like. Check out the wear.

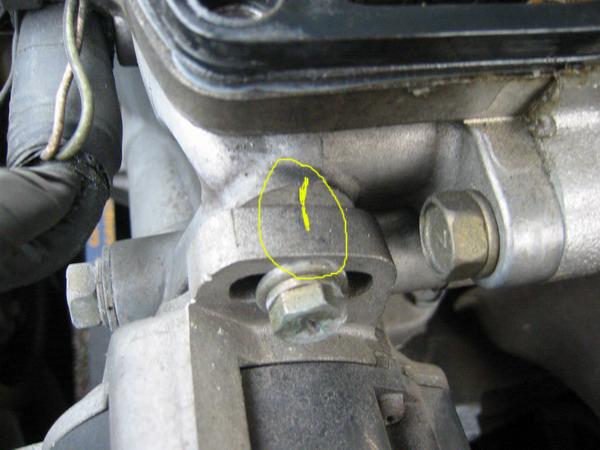
-Now before you start taking off the distributor, make a making on the mount as shown below. This will help you with installing everything back with close to correct timing.
-Using a screw driver take off the cap(part that has the spark plug wires attached) off the distributor. There are two screws holding this. One on top and one on bottom. Once you take it off, you should see this. Make a marking on the rotor and the distributor so that when you install it, you know it's in correct position.
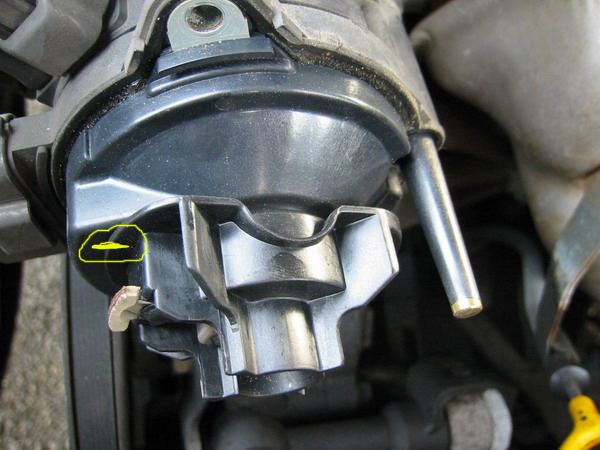
- Now, you are ready to take the distributor off. Unbolt the two bolts, circled in yellow, that are holding the distributor. One on top and one on bottom.
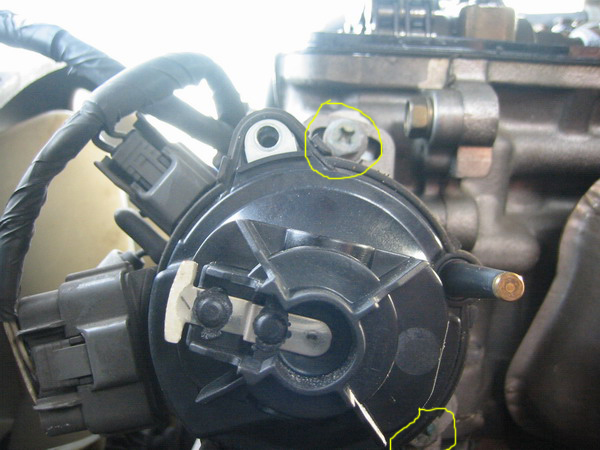
- Tug on the distributor with a bit of force. It should come out with a sound of "pop"
5. Take off the camshaft sprocket cover
- Here is a picture of the cover with location of the bolts and their torque specs. Please remember to distinguish between lb*in and lb*ft
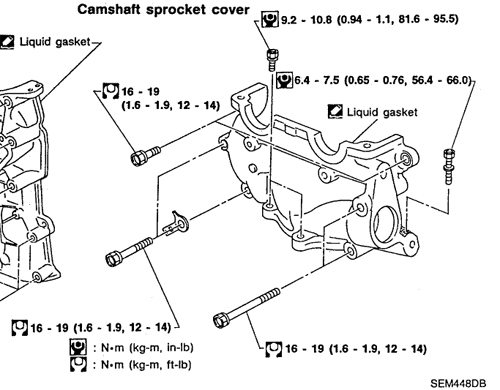
- You might have to take a rummer mallet and gently tap on cover to get it off.
6. Remove the guide #2 and clean the tensioner
- Remove the two bolts, circled in yellow, to remove the guide #2.
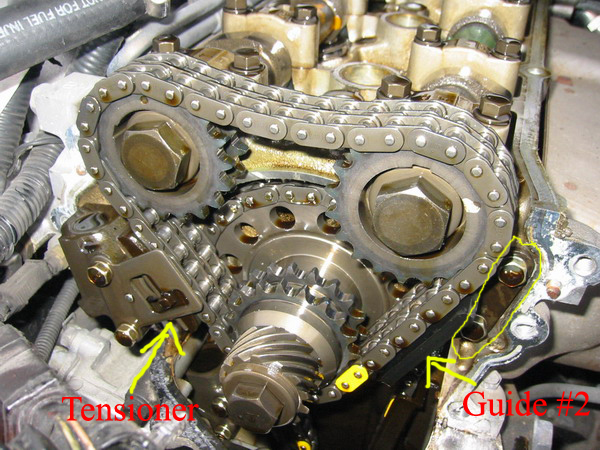
-What my guide looked like.

-Now check the condition of the tensioner. If it's really gunked up with oil then spray some WD-40 and move the tensioner in and out repeatedly (many many times) until it comes out all the way and goes in all the way freely. Here is a video of what I am talking about.
Video Link
To make sure that the tensioner is all the way out, try pushing the tensioner towards the chain.
-Check the condition of the bottom tensioner as well. It it's stuck then do the same thing as the upper tensioner. Here is a picture of the lower tensioner
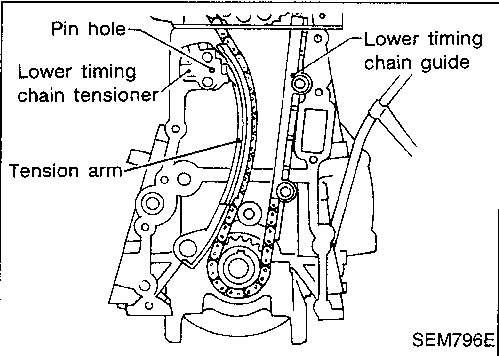
7. Install the camshaft sprocket cover
-Now your guides are gone and your tensioners are working again. It's time to install everything back together.
-Using a plastic scrapper of some sort clean the surface where the camshaft sprocket cover meets the engine. Be careful not to drop any gunk down the front cover.
-Apply your RTV liquid gasket as shown in the picture.

-Install the camshaft sprocket cover and torque to specs. Go easy on the tightening since the head is aluminium and you can easily strip the thread.
8. Install your valve cover
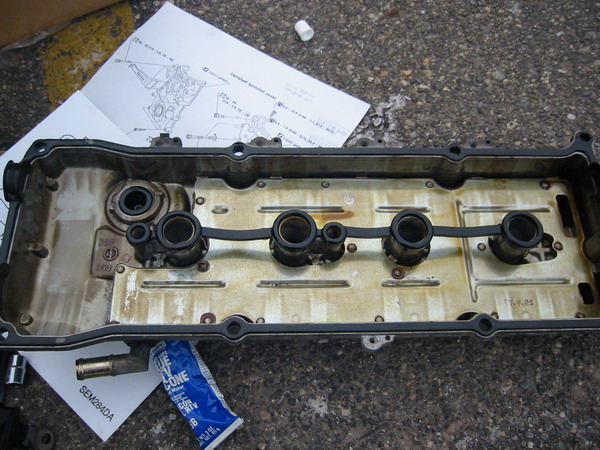
- Put your gasket in the valve cover as shown in the picture.
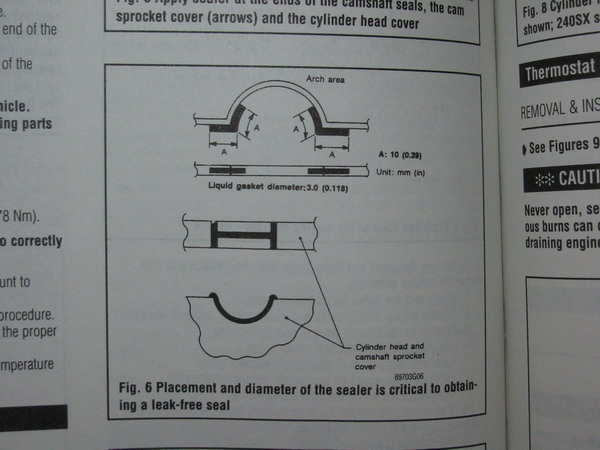
-Apply RTV sealant at the semi-cricle "ditch" in front of the camshaft and also in the back as shown in the picture.
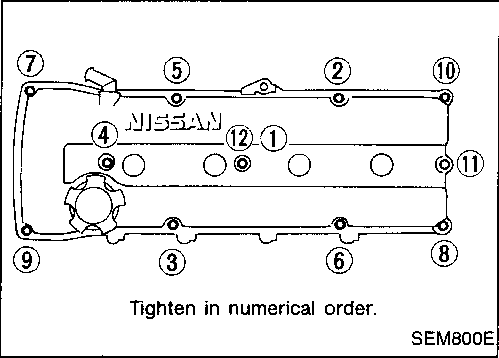
-Install your valve cover and tighten as shown below. Torque spec is around 7~10 lb*ft
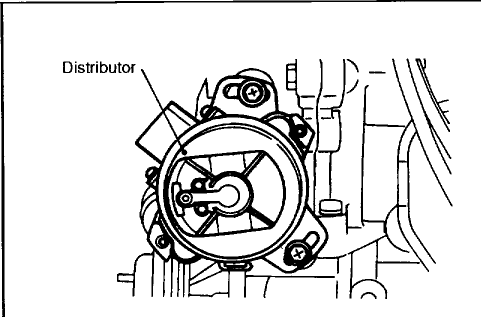
9. Install Distributor.
-Now this is the tricky part...
-If your car is S13, your distributor should look like this when #1 piston is at TDC on compression stroke.
-If your car is S14, you should align the distributor as shown below and it should look like this installed.
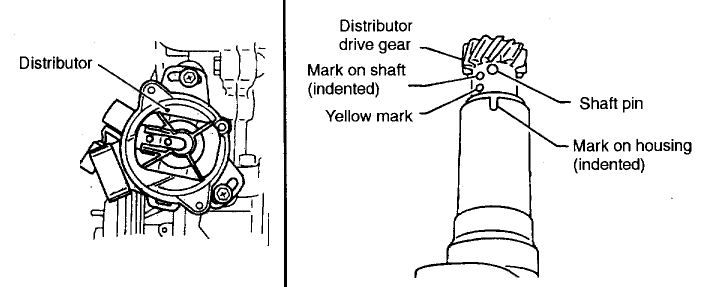
-If you made the mark on the rotor before, this would be a simple process assuming your engine did not move.
-Also, your rotor should be perfectly aligned with #1 spark plug wire as shown below.
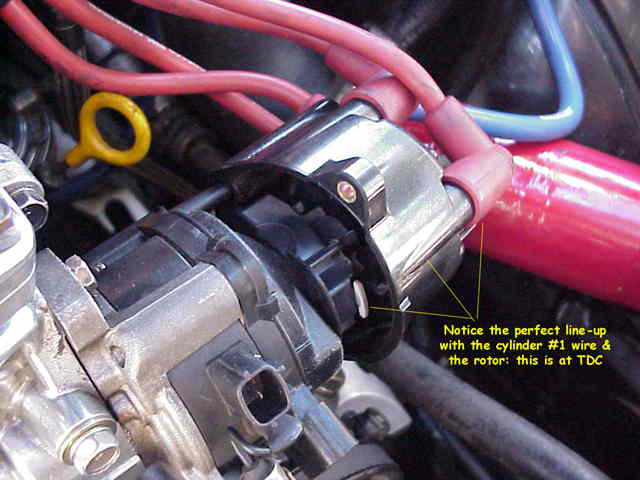
-Rotate your distributor so that it matches the marking you made on the mounts previously. This should bring you close to the timing you had before.
-Please note the spark plug wire position and install them back.
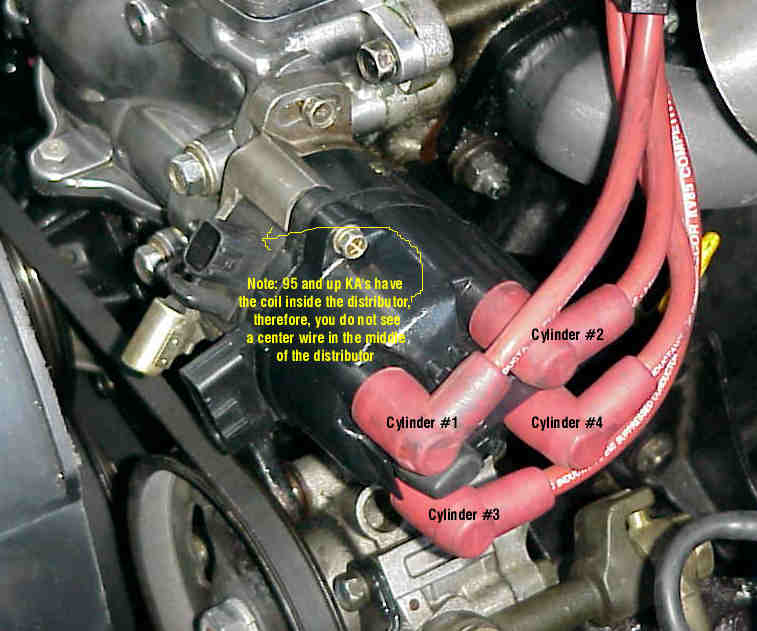
-Make sure everything is connected and good to go. Start your car and check your timing. If its not in spec, disconnect your throttle position sensor and adjust your idle so that is around 700 +-50 and check your timing. If its out of spec, make sure you installed your distributor correctly and rotate your distributor accordingly to retard or advance timing.
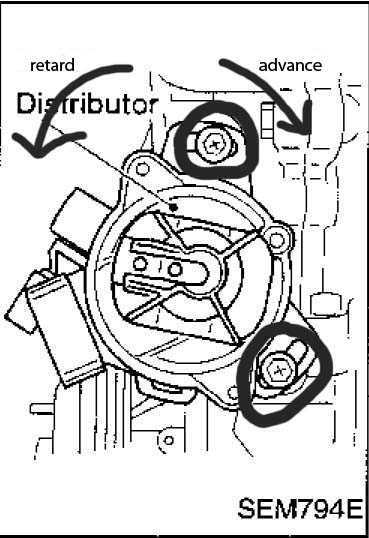
Pat your self on the back and grab a bottle of beer. You are finally done with the infamous timing chain guide noise.
-Mainichi Tuning